

Here are my puzzle pieces:
- ASUS G2S-A1 Laptop with 4GB RAM and dual 2.4 Ghz processors (Fig 1).
- Windows Server 2008 R2 Enterprise RTM (Fig 1)
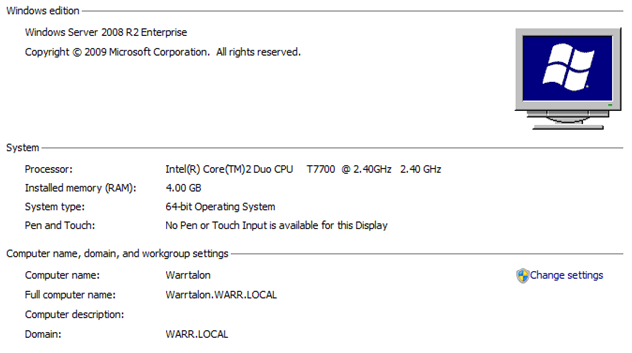
Fig 1 – System Info
- SQL Server 2008 Standard SP1 (Fig 2)
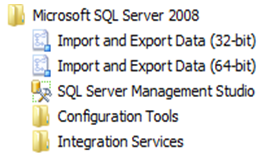
Fig 2 – SQL 2008
- Office 2010 64-bit (entire suite – Fig 3)
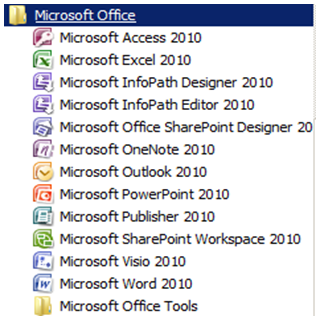
Fig 3 – Office 2010
- SharePoint Server 2010 (Fig 4)

Fig 4 – SharePoint 2010
- MailEnable Standard (Free SMTP/POP3 Software – Fig 5)
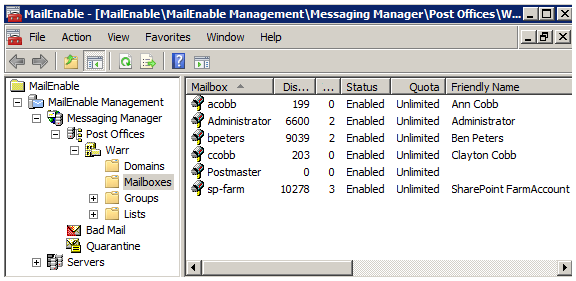
Fig 5 – MailEnable
-
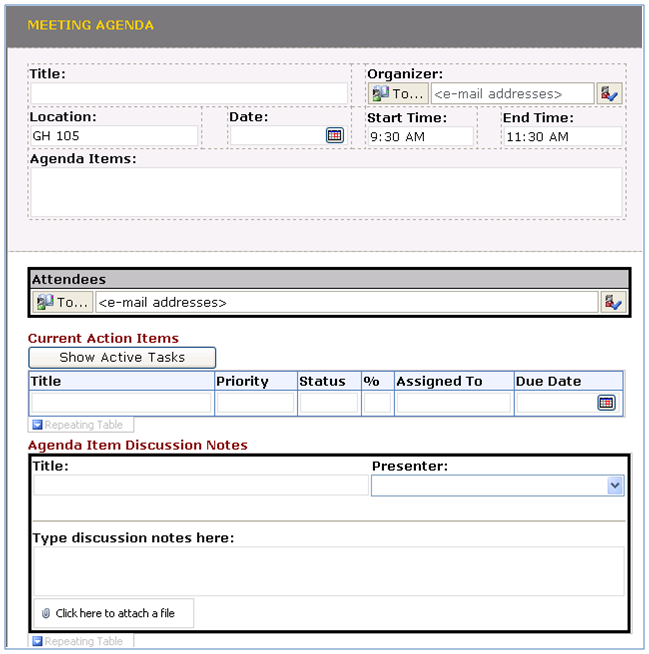
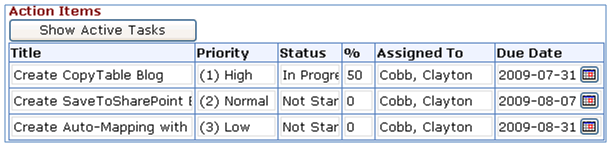
Client Computers
- Windows 7 Enterprise 64-Bit RTM desktop with IE8 and Office 2010
- Windows Vista Home Edition 32-bit laptop with IE7, Firefox 3.0, and Office 2007
ASUS G2S-A1 Laptop with 4GB RAM and dual 2.4 Ghz processors (Fig 1):
- The entire single server farm is built on one physical laptop with no virtualization
- Originally, with only 3GB RAM (due to previous 32-bit OS), my setup was a dog. It was getting killed with RAM usage sometimes maxing out
- Thanks to 64-bit, I was able to bump to 4GB and fully-utilize it. This made a huge difference as my peak RAM to date has been 3.1 GB and only when SQL had ballooned a bit. Even then, performance was good. Most of the time, even with 4-5 W3WP IIS worker processes running, I’m only eating up 2.5-2.8GB RAM. This seems to leave plenty of room for the operations I’m performing, including viewing browser-enabled forms and running workflows.
- My dual processors are constantly sitting in the 40-60% utilizatin range. Performance Monitor shows me that the bulk of it is being used by the Timer Service (OWSTIMER), but remember that I’m running all of the server and client software you see in this blog post plus multiple browsers and Outlook 2010 at all times.
- Interestingly, at this very moment, I’m only seeing <15% CPU but 3.1 GB RAM usage. That’s with everything running and open that I have mentioned and while just running a workflow that sent an email to Outlook 2010.
- Overall, I can see why the recommendations for RAM are much higher than in 2007. The WFEs will be more powerful but will require more power to sustain…
- I definitely plan to go to 6 or 8 GB, but my laptop can only handle 4, so my next build will be on an actual server. In fact, if things work out, I’ll do a server with 16GB RAM and then use Hyper-V to create a multi-server farm, although that is not technicaly supported in this version of Beta.
Windows Server 2008 R2 Enterprise RTM (W2K8R2)
After my 3rd time building my laptop into a complete, single server SharePoint farm, I finally feel comfortable with how W2K8R2 works in terms of roles and features. I’m not a sys admin by trade, so this is not my sweet spot, but I do feel pretty good after install #3. After playing with various roles/features and trying both a Workgroup with Local Users/Groups and a Domain with Directory Services, I think I have a decent setup to share with others. I realize there are many ways to skin this cat, but these are my experiences.
Roles and Role Services (Fig 6):
-
Active Directory Domain Services
- Active Directory Domain Controller
-
Application Server – .NET Framework 3.5.1
- All Role Services running
- DNS
-
File Services
- File Server
-
Distributed File System (Optional)
- DFS Namespaces
- DFS Replication
-
Web Server (IIS)
- All Role Services (there are a lot)

Fig 6 – W2K8R2 Roles
Features (Fig 7):
Most features get installed automatically as pre-requisites for the roles above or during installation of SharePoint 2010. This is a great thing about the new products – things don’t just fail because you forgot to activate a random feature:
-
Desktop Experience (absolutely need this one for the cool Aero effects, hah – Fig 8)
- This also enables many desktop features that are turned off by default on W2K8R2. You may not do this in a production environment, but for my single server testing, I want everything at my disposal
- For the Aero themes to work, you must download and update your graphics drivers
- After enabling this feature, you still must start the Themes service for desktop themes to work (not SharePoint themes)
- Group Policy Management
- Ink and Handwriting Services
- Message Queuing
- Remote Server Administration Tools
- SMTP Server
- Telnet Client
- Telnet Server
- Windows Process Activation Service
- .NET Framework 3.5.1 Features
- Wireless LAN Service (required if you want to use your wireless card)
- XPS Viewer
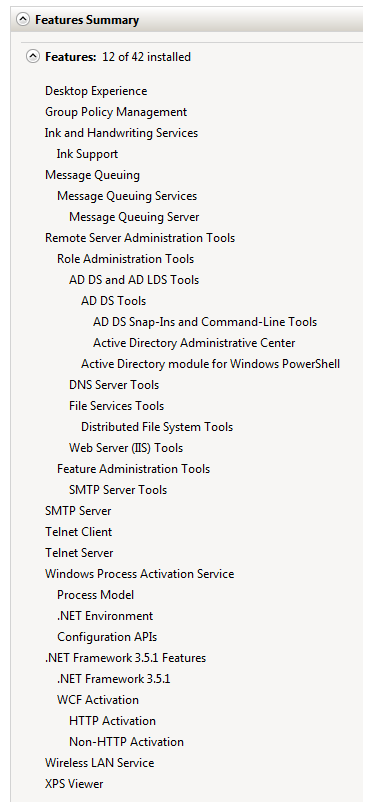
Fig 7 – W2K8R2 Features

Fig 8 – W2K8R2 Aero Theme
SQL Server 2008 Standard SP1 (SQL08)
- Upon starting the setup wizard, you are immediately notified that SP1 must be installed for SQL to work on this version of Windows. I followed suit.
- Install ran straight through without issue and without
- Didn’t bother with collation settings, but I normally choose Latin1_General_CI_AS_KS_WS. Collation settings are no longer part of the normal installation wizard.
- All of my checks passed at each stage
- Used a domain account specifically for SQL as the service account for all SQL services
- Used a domain account as the SharePoint farm account and setup account in one, which required setting dbcreator and securityadmin rights on the DB instance (Fig 10)
- I modified the Protocols in the Configuration Manager to enable Named Pipes (Fig 11)
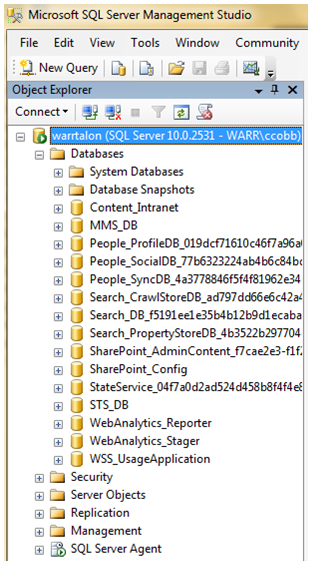
Fig 9 – SQL 2008 Management Studio

Fig 10 – SQL 2008 permissions for SharePoint Farm Account

Fig 11 – SQL 2008 Configuration Manager
Office 2010 64-bit
- Very simple install of Office Professional Plus 2010 64-bit plus Visio 2010, SharePoint Designer 2010, and SharePoint Workspace 2010
- InfoPath and SharePoint Designer are my bread and butter. I also leverage Outlook heavily for workflow email routing.
- A new tool to the mix is Visio, which can now allow business analyst to construct process diagrams into workflow templates that then get imported to SharePoint Designer. I’ll be showing that in a later update
- Although InfoPath has two separate products listed, it is still just one license and no chance of providing the Editor as a free download like Adobe PDF – bummer.
SharePoint Server 2010 (SP2010)
Wow, very easy install. The install wizard has a Preparation Tool that checks all your pre-requisites and installs them as necessary (Fig 12&13).

Fig 12 – SP2010 Installation Wizard Home Screen

Fig 13 – Preparation Tool Wizard
- Performed a complete install
- Ran the Products and Technologies wizard where I specified my DB instance and used sp-farm from above as the Database Access Account.
- Completed without error, and then Central Admin fired right up!!
MailEnable Standard
As of Windows Server 2008, Microsoft is no longer supporting POP3 as that has shifted completely to the Exchange team. So, we no longer have the ability to create mailboxes and such. You can still enable SMTP for relaying, but I need the ability to create mailboxes for my isolated domain users so that I could start doing workflows. After reading and learning why I couldn’t do this natively with W2K8R2, I found MailEnable, which is free for what I needed to do. This allowed me to create mailboxes for all of my users, assign email addresses, and associate those email addresses with each user’s Active Directory profile. MailEnable actually made it very easy by allowing me to import all of my AD users while simultaneously creating email addresses on the fly – simple and quick. Due to this, I was able to configure Outlook to use those mail accounts via POP3 and even got the address book to sync with AD for auto-resolution of names. This is now allowing me to do the end-to-end solution testing with SP2010, InfoPath 2010, SharePoint Designer 2010, Visio 2010, and Outlook 2010. Times are good… =)
**Here in Denver, my house is being pelted by a torrential hailstorm in the middle of August…mmmmk. Now I know why my insurance company just raised the hail deductible a few weeks ago…
**Blog created in and published by Word 2010 with help from OneNote 2010


