

qRules Series #1 – CopyTable

One thing that you can’t easily do in InfoPath is to copy repeating data from a secondary data source – like a SharePoint list – to the main data source. This is an important necessity, because the data from secondary data connections does not get saved in the resulting XML data file of a submitted/saved InfoPath form. So, when you look at the form initially, you see the nice pretty data from your SharePoint list enumerated within the repeating table you placed on the canvas, but if you were to open the raw XML file, none of that data would be there. This is because an InfoPath form only keeps whatever data is saved to its main data source. A data connection to a SharePoint list is just a secondary data connection, which in essence becomes a window into the data as it currently exists. Yes, you can re-open your XML file in InfoPath and see the data from your SharePoint list, but it’s the current instance of that data, not the data that existed at the time you previously submitted the form. Sometimes, this is ok, but what if you needed to get that SharePoint data into your form and keep it there? To do this, you must copy the data into the main data source. How can you do that? Well, you can custom code something, or you can use the great set of special commands known as qRules that is provided to all of us by Qdabra (qRules 1.7 is currently a free download). qRules allows you to do many things, but the one command we will focus on is named CopyTable.
Caveats:
- qRules introduces code to your form, so if your forms are browser-enabled, then they will require the Administrative-Approval publishing type. As of qRules 1.8, which will release this week (first week of September 2009), we can now use CopyTable in browser forms. I have tested it and confirmed that it does work. If you need information on how to properly publish a form template in this manner, refer to Janice Thorn’s blog post on the topic.
- The CopyTable command will only work if the nodes match, which also means each column has to have data in it (no blank fields). The reason your fields can’t be blank is because when there is a blank field, no placeholder for that field is brought down in the XML, so it’s as if that node doesn’t exist. Qdabra is looking at supporting this in a future version.
The example I will use for this blog is a Weekly Status form template (based off the Meeting Agenda sample) within a Meeting Workspace where you pull in Active Tasks from a SharePoint Task List on demand so that a snapshot of the tasks is saved within the form. The purpose of this is so that at a later time, the Weekly Status for that week’s meeting can be opened, and you will see the status of the team’s tasks when the meeting occurred rather than the current point in time. In essence, it becomes an historical record of the team’s tasks just like meeting minutes are intended to be. For the purposes of this blog, I will not go into great detail about meeting workspaces and how they work, but I will briefly explain how InfoPath forms need to be used in order to get the recurring meeting functionality. Here are the steps to accomplish the goal:
- Create Tasks List (covered in minimal detail)
- Create Meeting Workspace with a Form Library (covered in minimal detail)
- Create Form Template
- Install qRules and Inject Form
- Apply CopyTable Command Rule
- Publish the Form and Verify Success
Create Tasks List
- Create a simple tasks list.
- Add some tasks with a variety of statuses, priorities, and due dates (Fig 1).
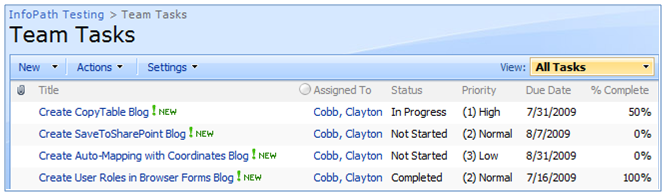
Fig 1 – Basic tasks list with several tasks added
- Take note that the Active Tasks built-in view only shows tasks that are not completed (Fig 2).

Fig 2 – Active Tasks view only shows incomplete tasks
- Set Active Tasks view as Default View.
Create Meeting Workspace
- Create a Basic Meeting Workspace with Recurrence (I prefer to use Outlook 2007 to create my recurring meeting, and then I use the integrated Meeting Workspace feature button to provision my site in SharePoint – Fig 3).

Fig 3 – Creation of Meeting Workspace in Outlook 2007
- Edit the default page of your new Meeting Workspace and close the default web parts (optional).
- Create Form Library and be sure to NOT click Yes for “Change items into series items” (Fig 4). If we do that, then all forms show on every meeting page (each recurring date). If we leave this as No, then only the relevant form for that meeting will display each week.
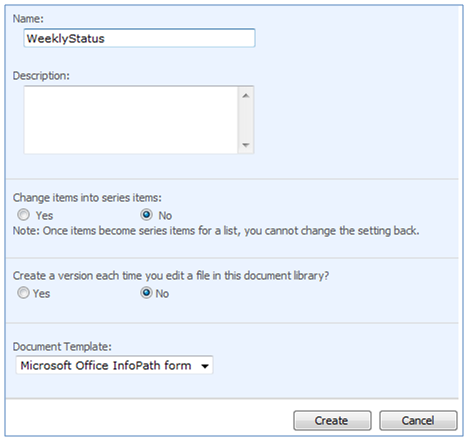
Fig 4 – Form library within a Meeting Workspace – not a series item
- This will put your new Weekly Status form library on the default page for each recurring meeting within this workspace (Fig 5).

Fig 5 – View of default Meeting Workspace page showing the current week Create Form Template
- Create new template based on built-in sample Meeting Agenda template and modify to your preference (Fig 6).
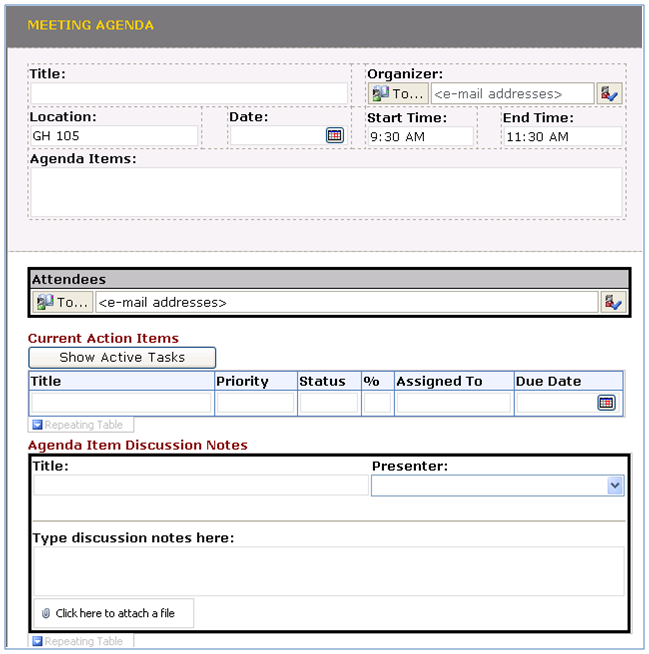
Fig 6 – Weekly Status form template
- Create a Receive data connection to the Team Tasks SharePoint list, but set it NOT to “Automatically retrieve data when form is opened” (Fig 7). Be sure to choose only the fields you want to ultimately see in the form, because this will play a big part in our CopyTable command.
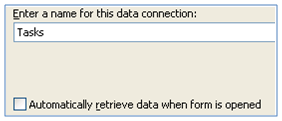
Fig 7 – Tasks data connection with automatic retrieval check box de-selected
- Create data structure in form template that exactly matches the data structure of the SharePoint data connection. Your SharePoint Tasks list data connection will include whatever fields you selected during the creation of the data connection from the previous step. Simply go to the Data Source pane in InfoPath and choose your “Tasks (Secondary)” data source. Drill down until you get to the nodes. You will notice that the fields within the Tasks repeating group are attributes and not elements (this is important). *Note: You can also see the raw data structure by clicking Save As Source Files and opening your Tasks.xsd file in notepad. Now, go back to your main data source and add a new non-repeating group (aka Table) that includes the Tasks repeating group (aka Row) and all the attribute fields (Columns). By default new fields will be added as elements, so be sure to add them as attributes so that they exactly match the attribute fields from the SharePoint list (Fig 8 ). The field names don’t have to exactly match, but you may find it helpful.

Fig 8 – Tasks node structure in main data source matching SharePoint secondary data source
-
Drag the newly added repeating Tasks group from your form’s Main data source onto the canvas as a repeating table and configure the columns/fields (Fig 9).
- Stretch and shrink the columns so that the data will display properly
- Change the Complete column header to %
- Change the % field control format to show Percentage with no decimal places
- Change the Due Date field control to a Date Picker (optional)
- You’ll also probably want all of these to be read-only fields. *Note: To make a Date Picker control Read-Only, you set conditional formatting on it that says, “If Due_Date is present, then make control Read-Only.”

Fig 9 – Tasks Main data source repeating table with formatting Install qRules and Inject Form
- Download and install qRules 1.7 from InfoPathDev.com (Qdabra’s community site). You can see here that qRules 1.7 does far more than just CopyTable, but those other commands will be the subject of future blogs. You can also get previously-written explanations and discussions related to qRules here.
- After a successful install, Inject qRules 1.7 into the form template (Fig 10)
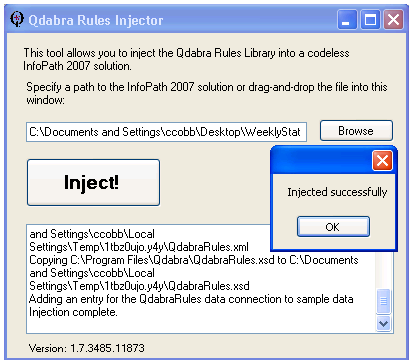
Fig 10 – Injecting form template with qRules 1.7 Apply CopyTable Command Rule
-
Create button for retrieving Active Tasks on demand and for performing the CopyTable qRule (Fig 11)
- Simply drag a Button to the canvas and change the label to something like Show Active Tasks
- Click the Rules button and Add a rule named something like Query Tasks and Copy
- Add an Action that Queries using the Tasks data connection
-
Add an Action that Set’s a Field’s Value, choose the Command node from the QdabraRules (Secondary) data source, and set the value to this command string: CopyTable /dsnamesrc=Tasks /tablesrc=/dfs:myFields/dfs:dataFields /rowsrc=dfs:Tasks /tabledest=my:meetingAgenda/my:Task /rowdest=my:Tasks /empty=yes
- KEY NOTE!! Do not try to paste your command string into the function builder (fx button). Just paste it directly into the Value field.
- dsnamesrc: This is the name of your source data connection, which is named Tasks in our example. Remember that this could be different if you apply this elsewhere, so be sure to use the proper name for this attribute
- tablesrc: This is the table within your data source that provides the data. You need to properly type in the hierarchy from the Tasks secondary data connection using the information you found in Figure 8. Notice that the namespace for a SharePoint list is dfs and not my.
- rowsrc: This is the repeating group that includes the nodes from your SharePoint data connection. Mine is Team_Tasks, but if you use the default Tasks list from a Team Site, this would just be dfs:Tasks.
- dsnamedest: This parameter is not used in the above command because it defaults to the main data source, but if you needed to copy your data to another secondary data source, you would provide the name of that data connection here.
- tabledest: Like tablesrc, this is the table that will receive the data. This uses the structure we created in our main data source in Figure 8. Notice the default namespace for an InfoPath form is my, and then my data source root is meetingAgenda due to using the Meeting Agenda sample template.
- rowdest: This is the repeating group where we want to send the data
- empty: This is a field that accepts a yes/no flag based on whether you want to first erase all existing data first from the destination table.
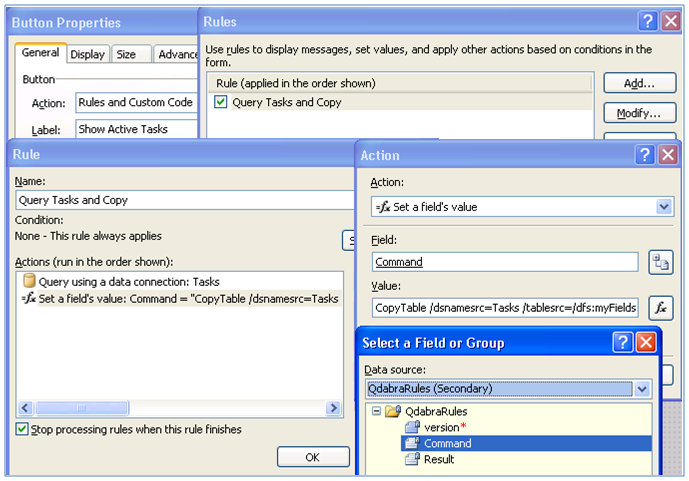
Fig 11 – Custom button that queries the SharePoint list and performs the CopyTable command
- Preview the form and click the button to verify that there are no errors and that your repeating table populates with the Active Tasks only (Fig 12).
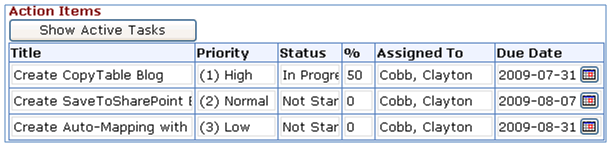
Fig 12 – Repeating table in main data source showing Active Tasks Publish the Form and Verify Success
- Publish the form, go to your Meeting Workspace, and click New in the form library
- Fill out as much of the form as you want
- Click the Show Active Tasks button, ensure it populates the table, and then click Save to save the form back to the library
- When you see the XML form in the library, click on it and verify that you still see the data
- Close the form, then go change an active task to mark it as completed so that it doesn’t show up in our Active Tasks view (Fig 13/14)

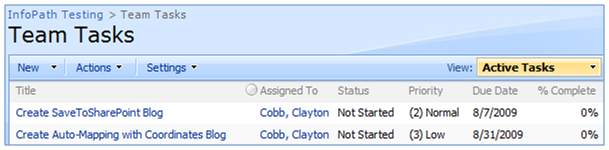
Fig 13/14 – CopyTable task complete and no longer active
- Re-open your existing form (Fig 15) and notice that you still see the previous data (3 tasks, not 2). This is the desired behavior, because we want to know the status of our Active Tasks at the time of the meeting, not later after the meeting when we re-open the form. If we were only showing the secondary data source, then we would always see the current Active Tasks, which is not desired. If you were to click the button again, then it would update with the new tasks, but that is not the intent here (feel free to apply conditional formatting to hide the button after it is saved). You would only hit the button on new forms when conducting future meetings. In the upcoming qRules 2.0, Qdabra will provide SharePoint list diffing capabilities, so you will be able to see what has changed when you re-open the form, because qRules would automatically compute the diff.

Fig 15 – Final view of completed form
- Another point of note is that we aren’t using my Auto-Generating Filenames for InfoPath Forms concept, because if you use submit in a Meeting Workspace, the XML form saves to the root of the form library, making it invisible to any of the recurring meeting dates. Using save allows it to save to its respective meeting (Fig 16) date and thus only see one form per meeting and ensuring that you only see the snapshot of active tasks at that given date.
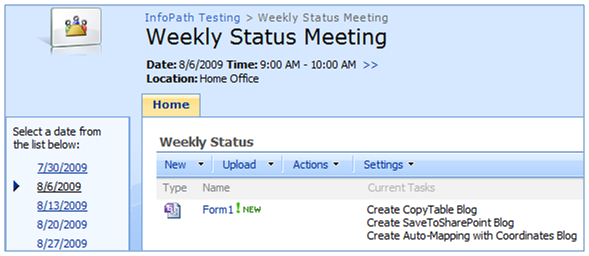
Fig 16 – Saved form shows up in proper meeting date

Fig 17 – Final Product
As an overview of what we’ve accomplished, here is a final set of pictures showing that our form is published and saved to one site while the Task list resides on a different site, but both are interacting within the same form. What you can’t necessarily “see” is that the data is not being presented from the SharePoint list as a Secondary data source, but rather it is being added into and shown from the form’s Main data source for later use and reference.
Upcoming Blogs in the qRules series
- Save images to SharePoint and convert to links in your form
- Calculate difference between two dates
- Get Error Count
- Generate GUID
