

Business Connectivity Services (BCS) – Creating an External Content Type (ECT) based on a SQL 2008 Table
Posted by Clayton Cobb on October 25, 2009
Let the SharePoint 2010 Madness begin! My first post-NDA blog entry will be about the new Business Connectivity Services (BCS), which replaces the Business Data Catalog (BDC). The purpose of the BCS (and formerly BDC) is to expose business data from non-SharePoint data sources within your SharePoint 2010 environment. Sure, we could do that with the BDC, but it required a very complicated application definition file (ADF) that made it very difficult to successfully create a connection. Due to this complexity and the fact that I’m not a developer at all, I never used the BDC myself without developer help. Also, we could only read from those data sources. At the 2009 SharePoint Conference in Las Vegas, Microsoft announced this as #2 on the Top 10 SharePoint 2010 features. Please bear in mind that the BCS is a huge topic that can go very deep. Todd Baginski (MVP) presented a deep dive on the BCS that goes far beyond what I’m talking about, so I will link to that presentation when it becomes available. Also, you can keep track of BCS info on the BCS Team Blog.
Well, things have changed drastically now. Not only can we build BCS connections in SharePoint Designer with a built-in GUI, we can also perform write actions back to the data source. This blog will be fairly simple, but that is by design, because I want to show that a non-developer can easily create a BCS connection and start interacting with external data within minutes. In this scenario, this is what we’ll be using:
- SQL 2008 Database with 1 Table
- SharePoint Designer 2010 connected to a SharePoint 2010 Team Site
Build (or locate) your SQL Server database
For this scenario, I built a very simple database with a single table containing 5 columns (Fig 1). Basically, I’ve created a Business Contacts DB for storing the business name, city, state, value, and partner status. After creating the DB, I added 9 rows from within the SQL Server Management Studio (SSMS) interface (Fig 2). For later use, remember that the DB Server is named “MOSS,” and the DB is named “ECT.”

Fig 1 – SQL 2008 Database with a simple table
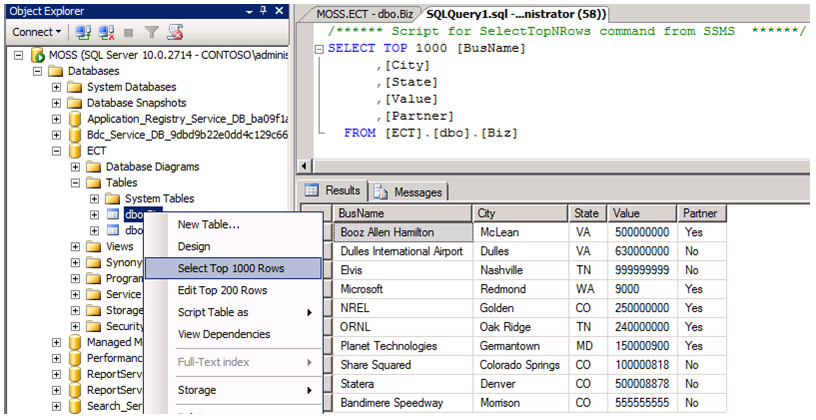
Fig 1 – SQL 2008 Database with business contact data
Create External Content Type in SharePoint Designer 2010
After creating the DB and noting the DB/Server name, it’s time to open up SharePoint Designer (SPD) 2010. SPD 2010 can only be used with SharePoint 2010. It cannot be used with MOSS 2007, SPD 2007 can’t be used with SharePoint 2010, and SPD 2010 cannot be used for editing other non-SharePoint websites. However, you can have both SPD 2010 64-bit and SPD 2007 (32-bit only) installed on the same machine (I have them both on my Win7 64-bit machine). It is now a dedicated design tool for SharePoint use. So, to use it, you have to have a SharePoint 2010 site to connect to, otherwise there are no available functions. Once you connect to your site where the External Content Type (ECT) should reside, click on the Site Object named “External Content Types” in the left navigation pane. After that, you should see a button on the top left of the ribbon labeled “New External Content Type.” Click that, and you will get to a page where you can create your new content type (Fig 3).

Fig 3 – New External Content Type view in SPD 2010
Name the External Content Type
First, you’ll want to name the ECT (Fig 4). The display name is what will show up in the External Content Types Site Object in the SPD 2010 left navigation pane.
Also, I forgot to show it on this screenshot, but the Office Item Type is important. You can leave it as generic, but if you choose the Contact type, then it will be treated like an Outlook contact, which means that if you later connect to this data from Outlook, all the data will show up in nifty Contact cards. I did choose that option when making my real ECT but forgot to show it on this screenshot.

Fig 4 – ECT named BizList
Discover Your External Data Source
Now, you’ll want to click the link next to External System that says, “Click here to discover external data sources and define operations.” This will take you to a new page where you click the Add Connection button, which causes a pop-up prompt to appear for selecting your data source type. The available options are .NET Type, SQL Server, and WCF Service (Fig 5). For this example, I chose SQL Server.

Fig 5 – External Data Source Type Selection
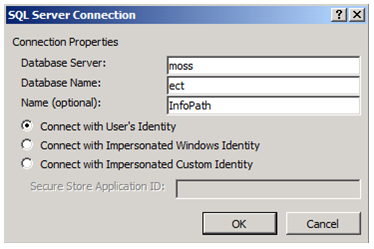
After choosing the SQL Server data source type, you get another prompt. This is where you define the connection to your database (Fig 6):
- Database Server: MOSS (noted above when showing the screenshot of SSMS)
- Database Name: ECT (same as above)
- Name (optional): What I learned with this field is that if you make the same ECT on another site collection, then you get a warning when trying to recreate an ECT in a different site collection with the same name. I had left this field blank the first time I tried it, so when I tried it again in the same farm with a blank name, I got the error. That’s when I decided to give it a name – the name of the site where I was using it. This is important to remember for the future
- Identity: I chose to connect with MY user identity – the user creating the ECT – but I of course have access to the SQL DB. If I didn’t, then I wouldn’t be able to make this. The 3rd option is the one that enables the Secure Store Application ID field at the bottom. This is the new Single Sign-On for those of you who used that in MOSS 2007.
Once you put in the correct information and click Ok, SPD will connect to the DB and return info about it. You will see the DB icon with the name you gave in the Name field above. You will also see folders that represent tables, views, and other items. You should see your relevant table within the Tables folder.
Fig 6 – Defining the connection to your SQL Server DB
Define Your Operations
This step is where the magic happens. After finding the table you want to use, right-click on it, and you will see some operations to choose (Fig 7). This part is beautiful, because it does it all for you without any code. In this case, I chose to Create All Operations. This options creates the well-known CRUD operations – Create, Read (Item), Update, and Delete – but it also creates an enumerate operation (Read List), so I like to call it CRUDE. 😛
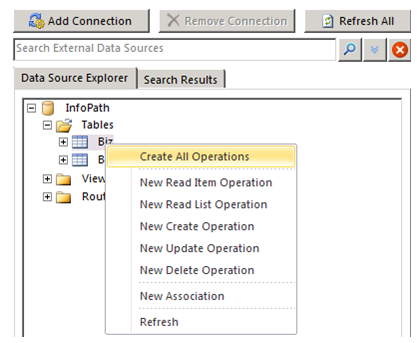
Fig 7 – Creating your CRUD operations
Again, SPD 2010 will do its thing, and when it finishes, you will see a report of the operations that were successfully created (Fig 8).
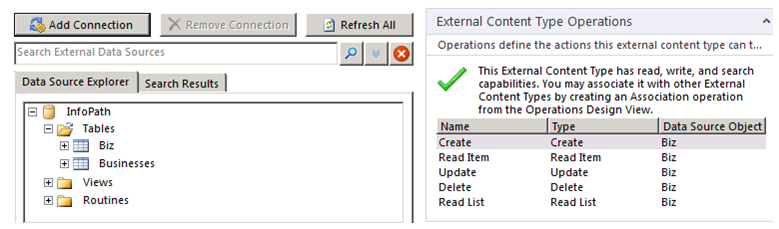
Fig 8 – A successfully created External Content Type with full CRUD operations
This leads us straight into the next blog, which will discuss what you do with an ECT once it’s created:

Leave a comment