

MAJOR REVISION that uses the GetCommonMemberships web method to determine group memberships for users without needing to use contact lists or any other manual data source!
InfoPath – User Roles in Browser-Enabled Forms Using Groups
So, you need to restrict certain controls in your InfoPath form, but it’s browser-enabled, and you just found out that User Roles are not supported, huh? You also see that SharePoint permissions do not help restrict specific areas within your form, so what do you do? There are probably several methods, but here is the one I have come up with that uses all built-in functions of InfoPath and MOSS 2007 without any code.
Here is an outline of the steps with the assumption that you already have a working, browser-enabled form:
- Contacts List
- Add GetUserProfileByName data connection to your form template if not already using it
- Add necessary fields to form template and configure them
- Add conditional formatting to applicable controls
Contacts List
In this solution, the Contacts list will provide the groupings of users for your “roles” within the form.. Here are the steps:
- Create a new Contacts List
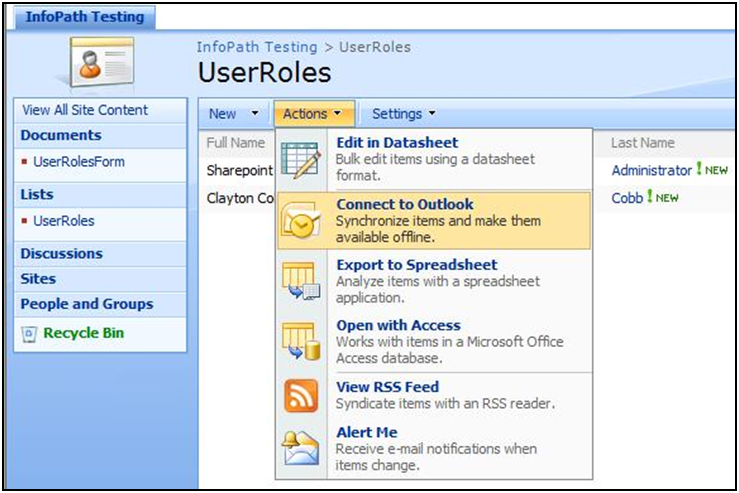
- Click Actions > Connect to Outlook (this step only for Office 2007/IE 6-8 users) – Fig 1
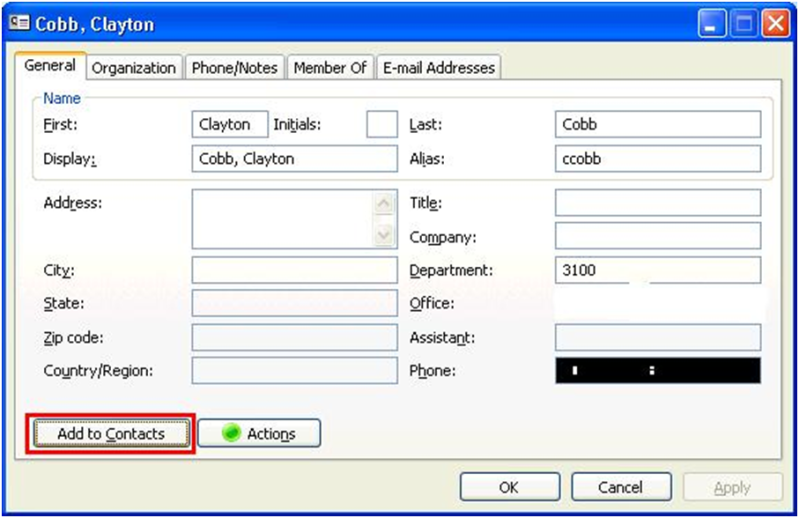
- Populate users from Global Address Book (or manually) – Fig 2 and 3
- Add any extra columns for sub-grouping of users (i.e. Department)

Fig 1 – Connecting to Outlook

Fig 2 – Add Contact from Global Address Book in Outlook

Fig 3 – Copy local Contacts to Synchronized SharePoint Contact List

Fig 4 – Final View of Contacts List Synchronized with Outlook
What we have done is used Outlook 2007’s two-way integration with SharePoint to ensure that our contact information in the SP Contacts List is exactly the same as what is in Active Directory, and since our profile import in this scenario is pulling from Active Directory, then our user information should all be synchronized. Notice that I’ve added a Department column to the Contacts list, because this info is in AD, the GAL, and in the SP profile database. Note: other data has been removed but would usually be seen here (email address, phone #, etc).
User Profile Service – GetUserProfileByName method
Now we must add this superb web service to our form template as a data connection. Please use the first 8 steps of Itay’s writeup to get this done as I can only give him credit for my extensive knowledge of this web service. Once you’ve added it successfully, we need to do a few things with it using the later steps in Itay’s blog.
Add Necessary Fields to Form Template and Configure Them
First, create two basic text fields in your main data source: strCurrentUserEmail and strCurrentUserDepartment. Next, drag two section controls to your canvas, and drag both text fields from above (Fig 5).
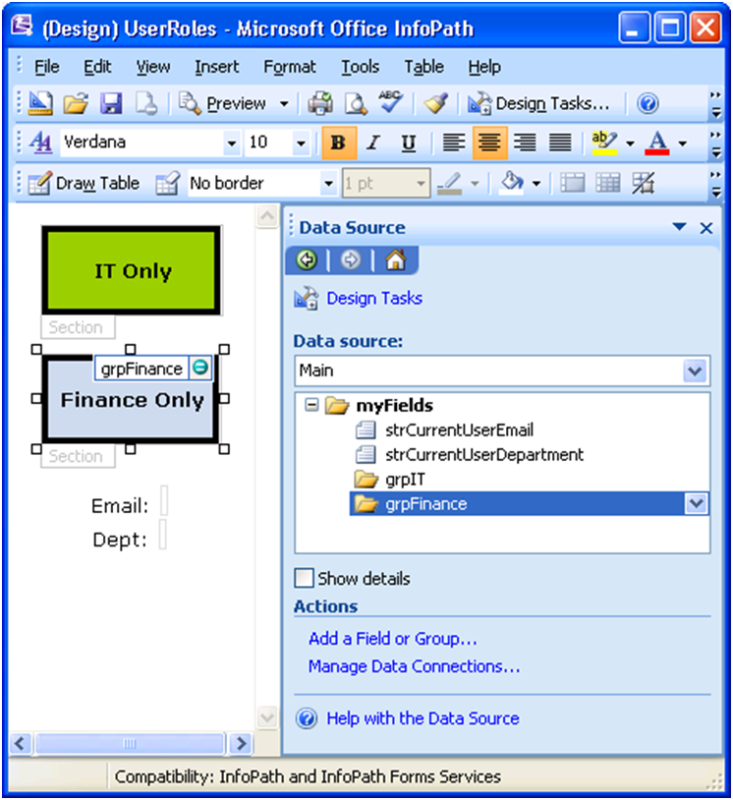
Fig 5 – Sample Form Template
Next, we need to get those fields populated with the proper information for only the current user, which means each subsequent user who opens the form will make the data in these fields change accordingly.
strCurrentUserEmail – Tools > Form Options > Open and Save > Rules. Add an action that sets the strCurrentUserEmail field to the WorkEmail value of the GetUserProfileByName data connection using the later steps from Itay’s writeup. It should look like this (Fig 6).
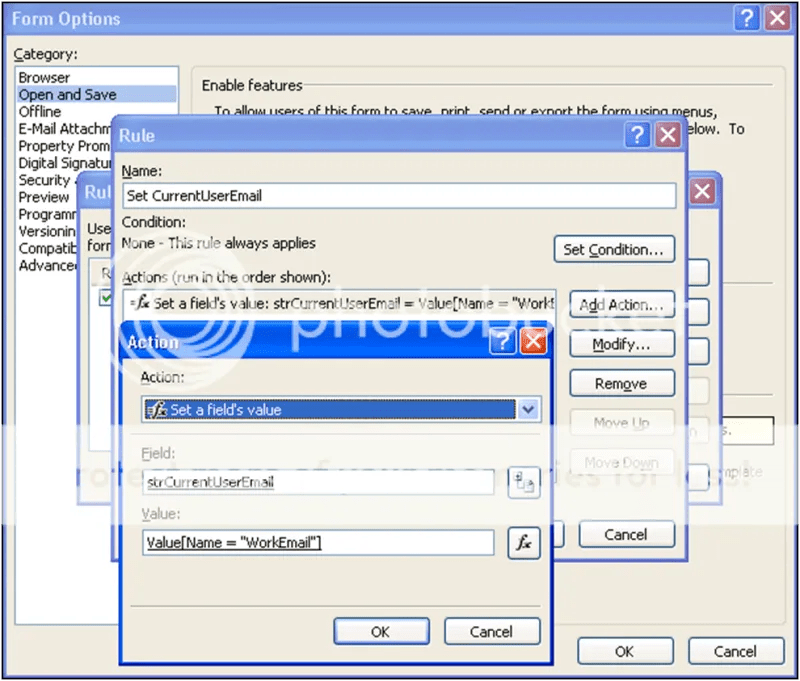
Fig 6 – Setting field to WorkEmail value
What this does is pull the WorkEmail value from the profile database for the user who just opened the form and puts that email address in our designated field. We could get this same value using the Default value function button on that field, but this would set the value once for the initial submitter and never change. I leverage this notion in another field named strSubmitterEmail so that I can also check to see if the current user is the original submitter.
strCurrentUserDepartment – Tools > Form Options > Open and Save > Rules. Add an action that sets the strCurrentUserDepartment field to the Department value of the GetUserProfileByName data connection the same way you did the previous step for WorkEmail. Note: You can add this action to the existing rule for email.
What this does is automatically pull the department of the current user and put it in the designated field.
Add Conditional Formatting to Applicable Controls
grpIT – Double-click this control on the canvas to get to its properties. Click Display > Conditional Formatting. Add a condition with two caveats. The first will check the contact list against the current user. The 2nd will check the contact list against the current user’s department.
- After clicking Add, click “Select a field or group” in the first dropdown. Change the data source to your Contact List, drill down to the data elements, click on E-mail_Address, and select “All occurrences of E-mail_Address” in the bottom dropdown (most people never notice this – Fig 7).

Fig 7 – Choosing All occurrences of a data connection field
For the operand, choose “are not equal to”, and for the last box, choose “Select a field or Group” again. From your main data source, select strCurrentUserEmail.
- Click the “And” button on the right to add another caveat to the condition. In this one, select strCurrentUserDepartment from your main data source in the first dropdown, “is not equal to” for the operand, and the text “IT” in the last dropdown. Be sure to change the “and” on the right to an “or,” and lastly check the box for “Hide this control.” It should look just like Figure 8.

Fig 8 – Conditional formatting to hide sections from unintended users
What we are essentially doing is checking to see if the current user is in the overall list of approved users, and then we are breaking it down further to see what department that person is in. If the current user is not in that list, then the section is hidden. If the person is in the list but not in the specified department, then the section is hidden. An alternative way to do the department filter is to make separate contact lists for each sub-group. If you do it that way, it requires more lists and more maintenance, but it allows you to assign a regular user as the owner of his/her respective list in order to maintain it (removes the burden from us). If you use one list with sub-categories, then you can’t as easily hand the maintenance over to regular users.
grpFinance – Do the same steps for this section as you did for grpIT except change the text “IT” to “Finance.” Note: Be sure that the text you type in situations like this is EXACTLY the same as what Active Directory shows. IT is not the same as it and Finance is not the same as finance.
Here is the final result. If you reference Figure 4 above, you will see that my department is shown as Finance…

Fig 9 – Finance user only sees the Finance section

Fig 10 – Manually changed Department to IT (demonstration purposes only)

Fig 11 – IT user only sees the IT section

Fig 12 – Log in as SharePoint Tester account

Fig 13 – SharePoint Tester not in Contacts list and sees nothing
**After it is all working, be sure to remove the text boxes from your form for strCurrentUserEmail and strCurrentUserDepartment, because they are only in this example for testing purposes. You want to make sure you can see the data that is being put in there during testing. Once it works, remove those text boxes, or if you want to show them, then make them read-only.
This is my first attempt at any blog post, so please feel free to critique and comment on any errors, bugs, typos, mistakes, fixes, questions, or confusions you may think of…
