This blog entry is a direct follow-up to Business Connectivity Services (BCS) – Creating an External List from an ECT. Through this blog and the rest in the series, we will be interacting with the External List that I created based on the External Content Type from the first blog: Business Connectivity Services (BCS) – Creating an External Content Type (ECT) based on a SQL 2008 Table.
I enjoyed learning about the new BCS features and how to quickly create both an ECT and External List. However, the area I’m MOST excited about is InfoPath 2010 and all of its many improvements. One major – and I mean MAJOR – change is the ability to now modify SharePoint 2010 (SP2010) list forms with InfoPath. Being that I love to use InfoPath forms for conditional formatting purposes so that my users only see what they’re supposed to see when they see it, this is a massive improvement for me. I have not been able to do that with my lists, so it has always been a struggle. To do anything remotely close to this, you had to use SharePoint Designer (SPD) 2007 to modify your ASPX pages and their web parts. This was very cumbersome, ineffective, and even had issues like the well-known Attachments Bug (fixed in SP2, I believe, but annoying for years). Using SPD 2007, you also didn’t have the full fidelity of a forms builder like you do with InfoPath. Well, that has all changed now, and although I wish I had have had time to do a regular list form for you, we are going to focus on modifying the list forms of an External List. I was very curious as to whether or not this would be doable, because I had proven the concept with normal lists in Tech Beta build, but I couldn’t get ECTs to work. So, when I got one day to work on a newer build, I focused 100% on ECTs and anything I could associate with it. I do have a customized list form in my personal SP2010 build from which I will get screenshots and do a separate blog later. For now, we’re taking the InfoPath list form concept and combining it with the awesome External List feature.
Here are the tools used in this blog entry:
- SharePoint Server 2010
- InfoPath 2010 Beta
- SharePoint Designer 2010 Beta
- SQL Server 2008
- BCS – External Content Type
- BCS – External List
Here are the steps of this blog entry:
- View existing data in SQL Server 2008
- View existing SQL data in an SP2010 External List
- Choose to customize list forms with InfoPath from within SPD 2010
- Customize list form in InfoPath 2010
- Create new list item
- View resulting data in the SP2010 External List
- View resulting data in SQL Server 2008
View Existing Data in SQL Server 2008
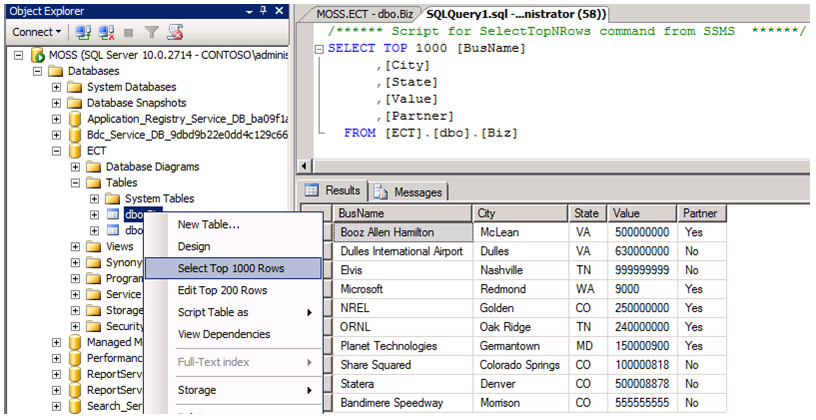
First off, we just take a quick jaunt over to SQL Server Management Studio (SSMS) to take a look at the Biz table in our ECT database, because that is the table feeding our External List. As you can see, it has 10 records (Fig 1).

Fig 1 – Existing data in SQL 2008
View existing SQL data in an SP2010 External List
Next, we mosey on over to SP2010 and browse to our External List that looks just like a normal SharePoint list except that we see the exact same data here as we did in our SQL table.
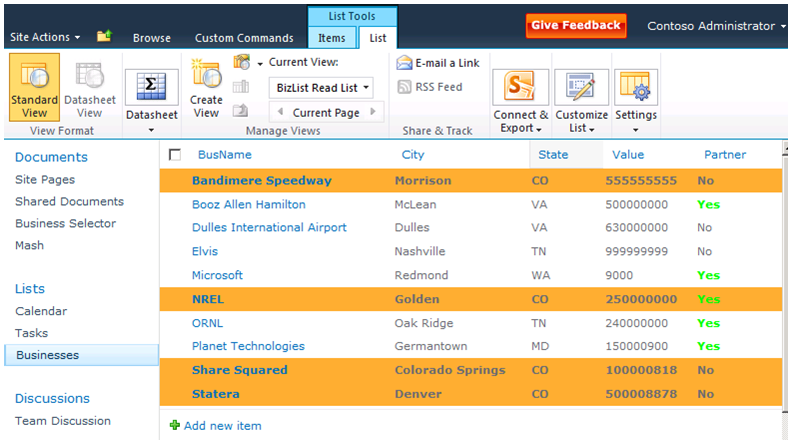
Fig 2 – Existing SQL data in an SP2010 External List
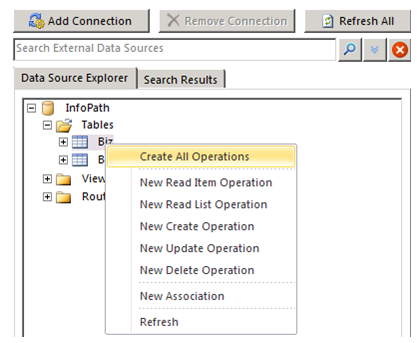
Choose to customize list forms with InfoPath from within SPD 2010
Unfortunately, in my haste to get screenshots before the machine got shutdown, I forgot to take a screenshot of this button in SPD 2010. This part is actually very important, because the behavior is different than a regular list form. With a regular list, you just browse to the list in SharePoint, click on the List tab in the ribbon (like you see in Fig 2), and you click the InfoPath icon in order to immediately customize your list forms. However, in an External List, it doesn’t work like that. In my early SP2010 build, the icon was there, but when it opened InfoPath, I couldn’t do anything. What I learned at the conference is that you have to go open the External List in SPD 2010, go to the Design tab in the ribbon, and choose “Customize List Forms in InfoPath” or something of that nature. This is the screenshot I need to get for you and add to this blog entry later. For now, though, if you get a chance to try it, you will be able to follow those instructions easily.
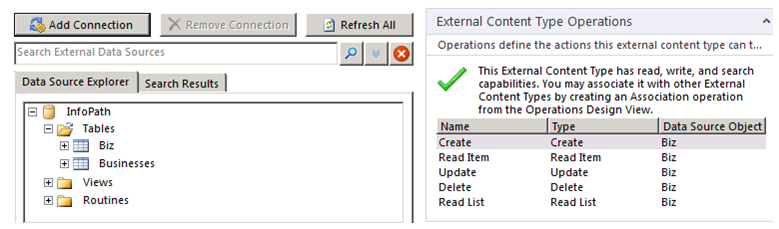
Once you click that button, it immediately invokes InfoPath 2010 and shows you the whole data structure for the list along with a pre-defined Main Submit data connection so that you don’t have to configure that. Your customization options within an External List form are much more limited than in a regular list form. I don’t yet have a list of what those are, but I will catalog them and add them here:
- External list forms do not support additional data connections – I learned this one right away, because it’s one of the first things I tried. In my regular list form, I was able to do this but not on the External List form. I verified with the InfoPath product team that this is a definite limitation that will not go away. Bummer, because I love to add the UserProfileService as a data connection to 99% of my forms for user validation. My earlier blog posts explain one very good reason for this: InfoPath – User Roles in Browser-Enabled Forms Using AD Groups. To be more clear, the bolded text in this bullet is the exact error I got when trying to add a data connection.
- Cannot change the schema – This is not an exact error, but with regular list forms, you can add a field in design time, and it will add that as a column to the list. With an External List, the schema is set and can’t be changed, so you can’t add nodes to the schema in InfoPath. I will get more verification and improved wording on this.
- More to come…
Customize list form in InfoPath 2010
So, again, I don’t have any snaps of my form during design time, but you will see it at run time below. In this scenario, I didn’t do anything fancy at all, because I just wanted to prove the concept. However, fancy or not, one thing I could not figure out was how to change all three forms – new, edit, and display. With regular list forms, all three can be selected and changed separately. With an External List, there is just one form that gets used for each instance. No, you can’t edit the display form, but it’s the same design. The main issue I had was that the Edit form was the same as the New form, and I love to change those up as well as my Display form. All I could find in SPD 2010 were threw new PAGES that got created after I chose to customize my list forms with InfoPath. The three new pages were named newifs.aspx, editifs.aspx, and dispifs.aspx if my memory is correct. When I went to edit those directly in SPD 2010, I didn’t ever get prompted with InfoPath. What I didn’t realize was that these new pages were using the brand new InfoPath Form Web Part, which is another awesome addition. Each of those pages had a single IP Form Web Part, and in the settings of that web part, you can choose which view to display as well as which action to perform upon submit. I didn’t look closely enough to notice this, but the InfoPath team explained it to me.
So, here is how you would go about setting up three separate “forms” for an External List:
- It’s just one form
- Create 2 new views (3 total) and design them according to their purpose (new, edit, display)
- Go to the editifs.aspx and dispifs.aspx pages in SPD 2010, edit them, modify the form web part, and set their view to the corresponding view of that page (editifs.aspx = Edit view).
- Also, a trick for the display view is to set your display view as the PRINT VIEW in the properties of the default view. This will apparently cause that particular view to always show up when a display page is opened
That’s pretty simple to me.
Create new list item
After publishing your form, browse to the External List again and simply click New Item (Fig 3).

Fig 3 – Click New Item in External List
As I mentioned before, this particular form has no bells and whistles, but I did make a few changes (Fig 4). I changed the Partner field, which is not a Boolean data type, to a checkbox. In the properties of that control, I set the checked and cleared values to match the exact syntax of what is in SQL so that there would be no conflicts. I also disabled the toolbars that are built-in and added a custom Submit button instead. I like to do this, because it allows me to put conditional formatting on my buttons to only show certain buttons to certain people at certain times and to do multiple sets of rules on each one. With the built-in submit button, you can’t do that.
As you can see, I added some info for a new business, and then I clicked Submit.
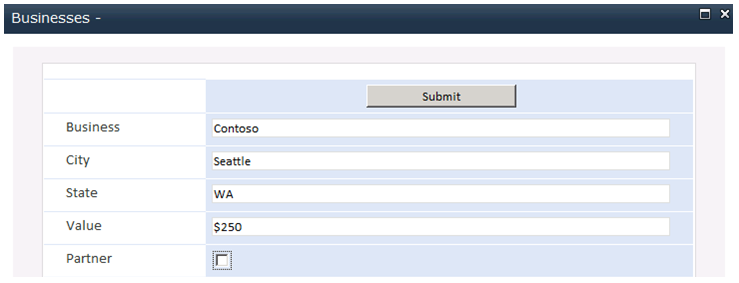
Fig 4 – InfoPath-based External List form
View resulting data in the SP2010 External List
After submitting, the form returned me to the External List where I immediately could see the new business along with all of its associated data (Fig 5).
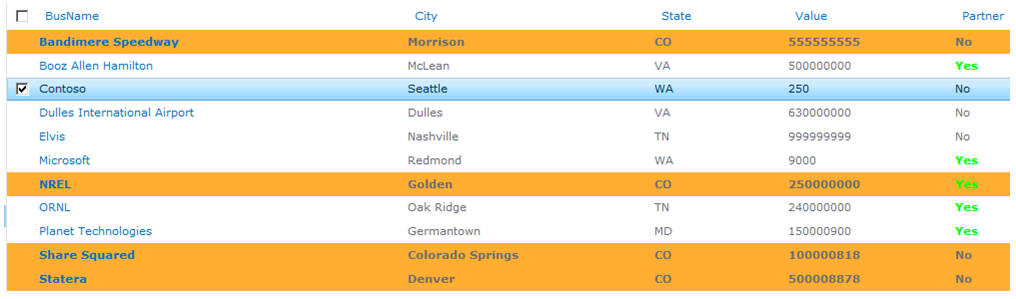
Fig 5 – Resulting data in External List
View resulting data in SQL Server 2008
A quick job back over to SSMS (Fig 6) reveals that the data was in fact written directly to SQL Server 2008 without a hitch…
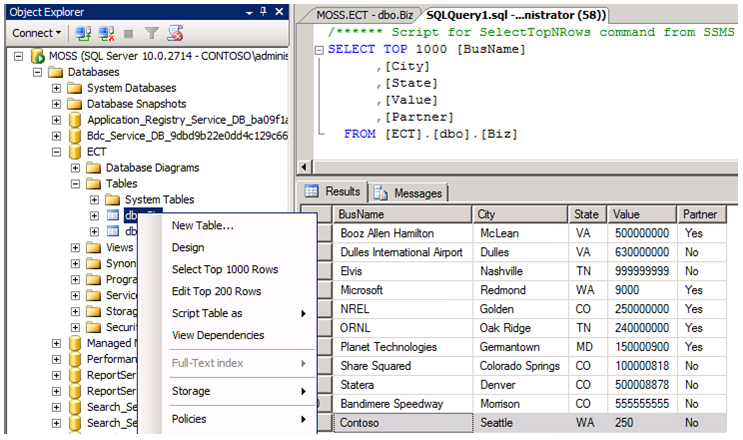
Fig 6 – Resulting data in SQL 2008
Some points to consider:
- This is just a simple, flat table structure, not a complex data structure with depth and relationships. If this is not quite complex enough for what you need to do, then please consider the DBXL tool created by Qdabra
- I have no middle layer between SharePoint and SQL, which is not a best practice. It would be best to use a web service
- I used the permissions of my administrator account to create the ECT and was using that same account when interacting with the form. You have the ability to connection permissions at the point you create the ECT and in the list itself
- Not being able to add additional data connections limits the options you have for doing advanced customization and logic
- Despite all of this, it is still awesome!
Next in line for this series:
- InfoPath 2010 – Connecting a Form Library template to an External List