Clayton's SharePoint Madness

All About SharePoint, InfoPath, and SharePoint Designer!

Posts Tagged ‘active directory’

InfoPath – User Roles in Browser-Enabled Forms Using AD Groups

Posted by Clayton Cobb on July 19, 2009


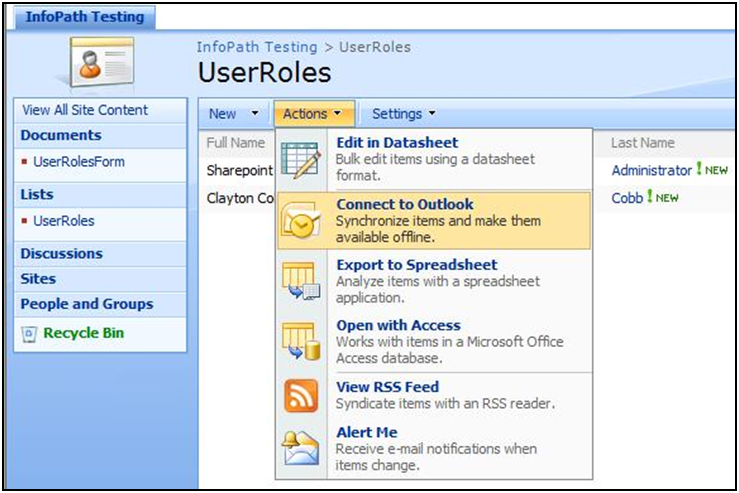
MAJOR REVISION – Now using GetCommonMemberships web method to determine group memberships for users without needing to use contact lists or any other manual data source!

So, you need to restrict certain controls in your InfoPath form, but it’s browser-enabled, and you just found out that User Roles are not supported, huh?  You also see that SharePoint permissions do not help restrict specific areas within your form, so what do you do?  There are probably several methods, but here is the one I have come up with that uses all built-in functions of InfoPath and MOSS 2007 without any code and leverages Active Directory Security Groups.

Special thanks to a co-worker of mine – Irene Clark – who I taught to use the UserProfileService and subsequently figured out on her own that GetCommonMemberships could help with User Roles.  She showed it to me, and I immediately jumped on it to come up with what you see here.   Thank you very much, Irene!

Here is an outline of the steps with the assumption that you already have a working, browser-enabled form.  If anyone needs me to write up the basic steps of doing creating a browser-enabled form from scratch, let me know via the Blog Request Log:

  1. Add GetCommonMemberships data connection
  2. Add necessary fields to form template and configure them
  3. Add conditional formatting to applicable controls

User Profile Service – GetCommonMemberships Method

We must add this superb web service to our form template as a data connection.  Please use the first 8 steps of Itay’s writeup to get this done as I can only give him credit for my extensive knowledge of this web service.  Once you’ve added it successfully, we need to do a few things with it using the later steps in Itay’s blog.  Here are the steps.  They are only text with no screens, so I will just paste them here.  Remember that we are leveraging a different web method than Itay, but it’s the same web service:

  • With InfoPath opened go to Tools > Data Connections, and click ‘add…’ to add a new data connection to the form. This opens up the Data Connection Wizard.
  • We want to receive data from the WS about the current user, so choose receive data’ and click next.
  • Our data source is a WS so choose ‘Web Service’ and next.
  • Now you will have to point the wizard to the WS. Type an address similar to this: http://ServerName/_vti_bin/UserProfileService.asmx  and click next.
  • Here you get a list of all methods for that WS, choose GetCommonMemberships and click next.
  • In this screen you can specify what parameters are sent to the method, we are relying on the method’s ability to return the current user name if no value is passed to it, so we will leave this as is (no value is passed to the method) and click next.
  • Click next and make sure ‘Automatically retrieve data when form is opened’ is checked.
  • Finish the wizard.

In this solution, the GetCommonMemberships (GCM) method of the UserProfileService will provide the values we need to check a user’s Active Directory (AD) Security Group (SG) and Distribution List (DL) membership.  This method also provides SharePoint (SP) Site membership, but that is not as useful as if it provided SP group membership, which it does not.  I will be focusing only on the AD group memberships for this write-up.  Here are some steps showing how to use and see what this method provides:

  • View this method’s node structure
  • Drag the whole repeating group to the canvas and preview to see the result
  • Reduce the table to the most useful fields and decide which ones you want to leverage
  • Filter to show only the AD groups
  • Create a dropdown control bound to an element in your main data source that will show a selectable list of groups for a given user
  • Use this information to apply conditional formatting on other controls

Notice that the node structure in the GCM method (Fig 1) is much more friendly than GetUserProfileByName.  You can clearly see the information that is available, and the nodes are self-explanatory for the most part.

URG1

Fig 1 – GCM Node Structure

Grab the MembershipData repeating group onto the canvas and choose Repeating Table when prompted.  This lays out the entire node structure nicely, although you will need to expand the table and the columns in order to clearly see the data (Fig 2).

URG2  

Fig 2 – Full GCM Repeating Table Structure with Sample Data

In my opinion, certain fields are not useful to us due to either not having data or not having data that is useful for determining User Roles.  I will delete the columns named Group Type, Privacy, ID, Member Group ID, and Group (Fig 3).  Notice that Member Group ID does have some unique info, but I am not yet sure how to leverage that data.  You may also want to remove the SourceInternal field from the MemberGroup section, because it shows the same GUID each time (at least in my system).  As for the remaining fields, here are my notes so far:

  • Source: This shows whether or not the record is an AD group (noted as “DistributionList”) – or a SharePoint site membership (noted as “SharePointSite”).  Notice, these are not SharePoint groups, but rather site memberships and only where the user has been specifically added to that site with permissions as opposed to inherting permissions through AD SG membership.  The AD groups include both SGs and DLs, which is important to know.
  • Member Group – Source Reference: This shows the Organizational Unit path in Active Directory of the DistributionLists and shows a GUID for SharePointSites.
  • Display name: This is the Display Name of the group as defined in AD.  In Outlook, this name can typically be used as an addressee for an email, and the name will resolve to the email address.  This name SHOULD be unique and will be what we use for our User Role matching later.  For SharePointSites, this is just the site name.
  • Mail NickName: This is the alias for that group in AD, and it also will resolve to the email address when used in Outlook.  However, I found in my system that there were _two_ separate contacts in the GAL with the same alias.  That should not happen, and I will be notifying the AD admins, but the fact that it did happen with a common SG I use means it is not a guarantee, so be wary of that.  The same could potentially happen for Display Name, but that is a much longer and more specific name while aliases are sometimes just a few letters.  There is no nickname for SharePointSites.
  • URL: This is the direct email address for the group in the form of mailto:name@domain.com.  This also could be a very good source for matching groups and/or for sending emails.  Again, the email address SHOULD be unique, but that all depends on how well your AD is maintained.  For SharePointSites, it shows the URL to the site.

URG3

Fig 3 – Partial GCM Table with Relevant Columns Only

If you ever plan to use this method for displaying a user’s list of group memberships, you may want to only show the DistributionList records.  To do so, simply right click on the repeating table itself and create a conditional formatting rule that hides the control if the Source node is equal to “SharePointSite” in it (Fig 4).  Interestingly, when going through the wizard to set this condition, the wizard automatically detected the available options for that node.  I am used to seeing that with my main data source, but it does not always happen when referencing a secondary data source node.  In this case, it helps to quickly choose the right selection without the potential for a syntax error.  The result will be that you only see DistributionList records in the repeating table, which is the information that would be useful.

URG4

 Fig 4 – Set Filter on GCM Table to Only Show AD groups

You may also at some point wish to show a user’s group memberships in a pulldown and then use a particular selection to trigger a rule or match some other condition elsewhere in the form.  You may even use it to see another user’s memberships (other than the current user) and then select a group to then invoke the UserGroup web service (or possibly other available web services/methods similar to this) to enumerate the users in the group.  That is outside the scope of this write-up, but it’s something to consider.  To set up the dropdown, follow these steps:

  • Create a text data element in your main data source with whatever name you prefer
  • Drag that field to the canvas, which makes a text box
  • Right-click that box and change it to a Drop-down List Box
  • Double-click the dropdown to get to its properties (Fig 5)
    • Select the radio button that says, “Look up values from an external data source
    • For the Data Source, choose GetCommonMemberships
    • For Entries, click the button, drill down through the groups, and select the MembershipData repeating group
    • For Value, choose whatever node you prefer as your primary key (unique value).  DisplayName, Nickname, and URL are all suitable.
    • For Display Name, choose the DisplayName node
  • Click OK until done and preview the form.  You should see the friendly names of your groups all listed in the dropdown.  Since this is a browser form, we cannot filter the dropdown (at least until we get SharePoint 2010!), so you will see the SharePointSites, too. 

    URG5

Fig 5 – Dropdown Bound to Main Data Source and Showing GCM Group Data

Add Necessary Fields to Form Template, Create Layout, and Configure Default Values

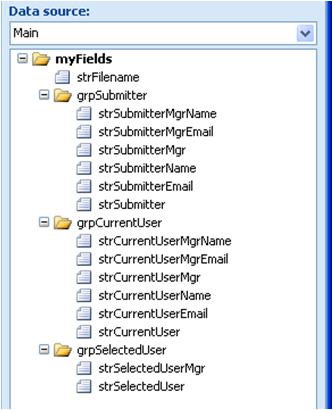
First, manually create all the fields and groups you see below (Fig 6).  Notice that strAdmin and strFinance have default values.  Do not mimic these in your real form, because they will depend on your group names, which we’ll get to shortly.

 URG6

Fig 6 – Data Structure

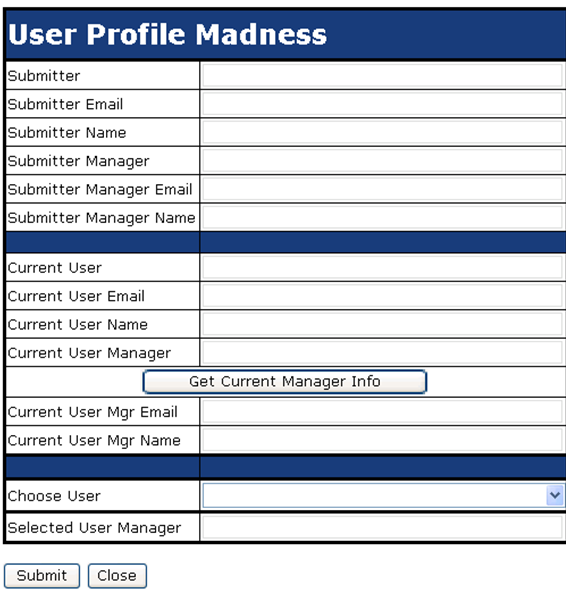
Next, we need to create our layout on the canvas (Fig 7).  For this example, I just simply have two sections that are bound to grpAdmin and grpFinance (do not include their child fields), respectively, along with some text and a color for differentiation.  I also have a repeating table bound to the MembershipData repeating group of the GetCommonMemberships method that is only showing the DisplayName element.  This is only on the form for now to show what is happening, but it would not be on the form when using this concept unless you have some reason for showing the current user’s groups.  You get this on the canvas by following the steps shown in Figures 2-4.

 URG7

Fig 7 – Form Layout

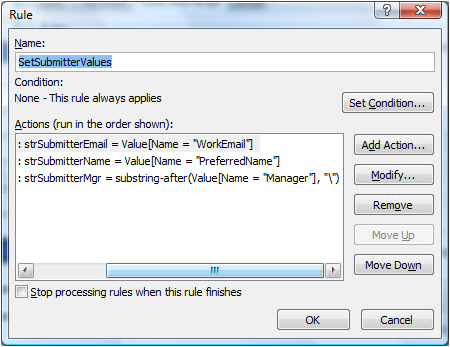
After that, we need to assign our initial values that will play a part in the security of our form.  For this exercise, we will use two Group Check Fields. This part is important, because this is what defines the group memberships in your form that will be leveraged for User Roles.  I am using “Sharepoint Admins” and “Finance,” because those are the _exact_ words that show up in the DisplayName field of GetCommonMemberships (refer to Fig 2).  In your case, you’ll want to add a field for each group that you want to define for your User Roles and set its default value accordingly:

  • strAdmin – Set the default value to the text “Sharepoint Admins” (no function used)
  • strFinance – Set the default value to the text “Finance”
  • Remember, please use proper values for your environment based off what you see in your equivalent of Figure 2 above

Add Conditional Formatting to Sections

  • Administrators Section – We are going to set conditional formatting on this control (Fig 8) so that if the user is not in the Sharepoint Admins security group, then this control will be hidden:
    • Double-click the Administrators section on the canvas to get to its Properties, click the Display tab, then click Conditional Formatting and click Add
    • In the first field, click Select a field or group
      • In the Data Source pulldown, select the GetCommonMemberships secondary data source
      • Drill down the dataFields path until you get to DisplayName, which you should single-click
      • At the bottom of this box where it says Select, choose the phrase All occurrences of DisplayName, then click OK
    • For the Operand, choose are not equal to
    • In the last box, click the pulldown and choose Select a field or group, then choose strAdmin from the main data source
    • Lastly, in the Formatting area, check the box for Hide this control

 URG8

Fig 8 – Conditional formatting to hide sections from unintended users

  • Finance Section – Do the same thing as with the Administrators Section except in the last box of the conditional formatting setup, choose strFinance.  This will compare the current user’s list of group memberships with the exact name of the Finance security group, which is what we set the value of strFinance to be.

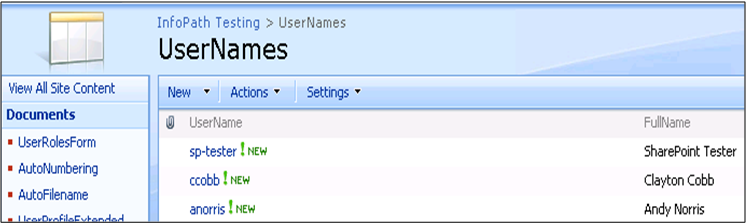
Now, it’s time to show it in action.  In my scenario, I have two user accounts:

  • Clayton Cobb – I am in the Sharepoint Admins SG but not in Finance
  • SharePoint Tester – He is in the Finance SG but not in SharePoint Admins

I’ll start with SharePoint Tester being logged in (Fig 9) who will open a new browser form (Fig 10).

 URG9

Fig 9 – SharePoint Tester logged in

 URG10

Fig 10 – SharePoint Tester only sees the Finance section

After saving the file as the SharePoint Tester, I will now log in as myself (Fig 11) and open the existing form (Fig 12). 

 URG11

Fig 11 – Clayton Cobb logged in

URG12 

Fig 12 – My account only sees the Administrators section

**After it is all working, be sure to remove the repeating table from your form, or if you decide to show it for some reason, you may want to make that field read-only so that users can’t manually change it.

That’s all there is to it!  You can now leverage Active Directory distributon lists and security groups for providing a mock User Roles functionality in Browser Forms without writing any code and while maintaining Domain Trust. The key here is that when looking at the same form, two separate users will see different information that is available based on their group memberships in Active Directory.  Imagine the other ways you could leverage this by restricting individual controls, whole sections, or even entire views, which is very powerful!

Posted in InfoPath 2007, MOSS 2007 | Tagged: , , , , , , , , , , , , , | 187 Comments »

Using [ME] to Filter InfoPath Form Views Based on Form Metadata

Posted by Clayton Cobb on June 29, 2009


This is something that I ran into a while ago where I couldn’t seem to promote a field from my form into an existing Person/Group column in my form library.  Even though the data in my field was correct (domain name or email address), I was unable to connect them due to the Publishing Wizard saying the data types don’t match.  This happens even if you use a Contact Selector that has the AccountID attribute – it won’t match.  So, I thought up using SharePoint Designer to pull the data from the promoted field in InfoPath and setting it as the value for an existing Person field.  Doing it this way will only allow domain name (domain\username) and email address, but it works like a charm.  Sure, you have a duplicate column with the same info, but you can just hide the promoted column from InfoPath in your View settings.  Here is an article that someone else already wrote that shows how to do this step-by-step.  I was going to write it, but someone beat me to it.  =)

Create Personal SharePoint Views depending on an InfoPath field using [Me]

One thing to be VERY CAREFUL of is that when you use an SPD workflow to update a field, this is taken as an edit to the record.  So, if your workflow is set to automatically run on edit of a record, then you will cause an infinite loop.  To beat this, you have to put a condition on the Set Field in Current Item action that states “If <InfoPath promoted field> is not equal to <SharePoint Person Field>” or something to that effect and have an Else statement that simply “Stops the Workflow”.  The problem is that the Person field consumes certain data (i.e. domain name) but displays other data depending on how the field is configured – the default is to show Name (with presence), which may cause the conditional statement not to work properly.  You want the condition to stop the workflow if the Person field in SharePoint has already been set with the CURRENT info in the InfoPath promoted field.  You can’t use the statement “If <SharePoint Person Field> is blank,” because the name may get changed in the form after creation.

Posted in InfoPath 2007, MOSS 2007, SPD 2007, Workflow | Tagged: , , , , , , , , | 7 Comments »

InfoPath – Get Manager Information

Posted by Clayton Cobb on June 21, 2009


This does not contain separate information, but I wanted it to show up for people doing searches while trying to figure out how to get Manager information from Active Directory.  I see this question a lot, and it is touched on in great detail in this blog entry:  InfoPath – Get user information without writing code (extended).  That entry contains additional info, so I just wanted to get this blog title out there for people to find.

Posted in InfoPath 2007, MOSS 2007 | Tagged: , , , , , , , , | 14 Comments »

InfoPath – Get user information without writing code (extended)

Posted by Clayton Cobb on June 21, 2009


In terms of free, out-of-the-box functions, I consider the UserProfileService to be the most powerful thing that can be used in SharePoint-based InfoPath forms.  Itay Shakury made this wonderful blog post over two years ago that told us how to Get the current user without writing code.  That blog post is so popular that Itay is still answering questions as recently as TODAY (June 20th, 2009).  What we will talk about today is how to take this concept and extend it further so that you can get any profile info for any user by querying within the form after it has been opened through rules triggered by changed fields and buttons.  One specific example will be to use the Manager node to get the manager’s additional info.  Let’s begin…

Note: The following assumes you have already implemented the UserProfileService solution above, specifically the GetUserProfileByName method…

Another Note: The UserProfileService does NOT touch Active Directory.  It only touches the Profile Database, which is part of the SSP, so it requires you to be importing profiles through the SSP to populate this database, because that’s where all the information comes from.  The profile import pulls data from Active Directory, so it’s like connecting to AD, but not directly.  Therefore, this web service is only available through MOSS and not WSS 3.0.  For anyone who would like to do the same things but without having this web service, please consider using the Qdabra Active Directory Web Service that can be used in any type of InfoPath form as long as the organization uses Active Directory.

This write-up will be very involved, so in order to keep it from being 20 pages long, I’m going to explain certain concepts in detail ONCE, and then I will refer to that concept multiple times later without having to show more screenshots.  Hopefully, that works. The 4 main ways we will be using the UserProfile Service:

  1. Populating default information upon form load
  2. Populating queried information with a button
  3. Populating queried information with a dropdown tied to a secondary data connection
  4. Getting Manager info

These are the steps we’ll take:

  1. Create form template with all relevant data elements
  2. Create layout table showing data groupings
  3. Create form library
  4. Create UserName custom list
  5. Create Data Connections – GetUserProfileByName web service, AutoFilename library Submit, and UserName list Receive
  6. Configure all fields and buttons – default values and rules
  7. Test Functionality

Create form template with all relevant data elements

You won’t need all of these for every form, but they are elements that I use for achieving some of the concepts.  We’re combining all of the concepts, so you can either pick out what you need or build it all for practice, and then apply bits and pieces where applicable on your existing and future forms.  The element names should be self-explanatory, so I’ll just use a screenshot to show you what should be built in the main data source (Fig 1) 


Fig 1 – Form template showing all relevant data elements

Create layout table showing data groupings

In reality, you won’t end up showing most of these fields on the canvas of your forms, but they are showing here for testing and demonstration purposes.  I recommend hiding most of the fields like the ones showing usernames and instead showing meaningful ones like the name fields.  Again, the picture should be self-explanatory up front, so just follow this structure (Fig 2).  Add a row for that custom button, then just drag the button to the canvas and rename it.  We will configure it later.  Also, do the same for the Submit and Close (optional) buttons below the table.


Fig 2 – Creating the layout table

Create form library

Create a basic Form Library on your SharePoint site.  Go to Form Settings > Library Settings > Advance Settings > Display as Web Page (optional).

Create UserName custom list

Create a Custom List on your SharePoint Site.  Change the Title column to UserName, and create another column named FullName.  Populate this list with 3 known users (Fig 3) and be sure to use their exact username (i.e. ccobb) and not the domain name (i.e. domain\ccobb).  For the Full Name, put whatever you prefer to use as a friendly name for that user.


Fig 3 – Creating the custom UserName list

Create Data Connections – GetUserProfileByName web service, AutoFilename library Submit, and UserName list Receive

Create 3 data connections (Fig 4) starting with the GetUserProfileByName web method from the first part of Itay’s blog entry


Fig 4 – List of all Data Connections needed

Next, create the Submit data connection for submitting the form to your form library while using the strFilename data element (Fig 5).  Ensure you select “Allow overwrite if file exists.”

Fig 5 – Submit using strFilename

Lastly, create a Receive data connection for retrieving the list of pre-defined usernames and full names.  Be sure to select those two nodes when connecting to the list (Fig 6)


Fig 6 – Retrieve UserName and FullName from custom list

Configure all fields and buttons – default values and rules 

There is a lot of work to do here, so bear with me.  I’ll try to consolidate the similar settings to hopefully make it quicker to read and do. We have logic built in 5 places (not including the Submit and Close buttons):

  1. strSubmitter – Default value and rules for setting other field values
  2. strSubmitterMgr – Queries web service and a rule for setting other field values
  3. Form Load – A rule for setting field values
  4. btnCurrentMgrInfo – A rule for setting other field values
  5. strSelectedUser – Bound to secondary data connection as a dropdown list, multiple web service queries, and actions for setting other field values.  This field puts it all together into one action.

strSubmitter – Set the default value for this data element to the function userName() (Fig 7).


Fig 7 – Setting strSubmitter default value to userName()

Create a rule with 3 actions that sets the values of the other 3 submitter fields (Fig 8).  Each action starts with “Set a field’s value,” but I have scrolled right to show the formulas.  Each formula is from the 2nd half of Itay’s blog entry.  I will show how to do the strSubmitterMgr rule as one example to follow for all three (Fig 9).  The actions HAVE to be in this order, or at least make sure that strSubmitterMgr is last in line.  Due to there being no conditions, this rule fires as soon as strSubmitter is populated by the userName() default value.


Fig 8 – Create a rule with 3 actions for strSubmitter

The formula for strSubmitterMgr is substring-after(Value[Name = “Manager”], “\”).  The Xpath for that statement in my form is substring-after(xdXDocument:GetDOM(“GetUserProfileByName”)/dfs:myFields/dfs:dataFields/s0:GetUserProfileByNameResponse/s0:GetUserProfileByNameResult/s0:PropertyData/s0:Values/s0:ValueData/s0:Value[../../../s0:Name = “Manager”], “\”).  I chose this for the example, because it is the most complicated.  It is using the substring-after function to strip out all the data that comes after the backslash, because the value that returns for “Manager” is a full domain name (i.e. domain\ccobb).  We only want the username (i.e. ccobb), thus the substring-after function.  If you built your form exactly like mine, then you can click the Edit Xpath button and paste in the Xpath statement above.  However, that would not teach you how to use the GUI to achieve this goal, and your forms won’t always follow this format, so this is how you create that formula (Fig 9).

  1. Set the Action to “Set a field’s value.” Select strSubmitterMgr in the Field box.  In the Value box, click the function button (fx). In the Formula box, type substring-after(, “\”) – copy and paste if you’d like.  Then, put your cursor before the comma and click Insert Field or Group.
  2. In Data Source, select GetUserProfileByName (secondary).  Drill all the way down through the dataFields groups until you get to the Value node.  Select the Value node, then click Filter Data.
  3. Click Add
  4. In the first dropdown, click select field or group.  From there, do the same thing you did in step 3 above.  Get back to the GetUserProfileByName data source and drill down until you see the Name node.  Select that node, set the operand to is equal to, then set the last pulldown to the text of “Manager”

If done properly, then all of those boxes should look like Figure 9.  Follow the same procedure for the other two fields in Figure 8 except for the substring-after function.  Hint: at the Insert Formula screen, you can copy that statement and paste it in the same box when configuring other fields.  You can then double click the Value[Name = “Manager”] part that is underlined and click through the settings to change the Name part of step 5.


Fig 9 – Creating the strSubmitterMgr formula to retrieve just the Manager’s username

strSubmitterMgr – As soon as the 3rd action from above completes for populating strSubmitterMgr, it is time to fire off another rule with 4 actions (Fig 10).  The first 2 actions have to be in that order, and they have to be first.  The last 2 actions are interchangeable.  Be sure to place these rules on the strSubmitterMgr field and not the strSubmitter field!

Fig 10 – Create a rule with 4 actions for strSubmitterMgr

You already know how to do the last two actions, because they are exactly the same as the strSubmitter actions.  Just be sure to remember and set the field values for strSubmitterMgrEmail and strSubmitterMgrName.  We’ll now focus on the first two actions.  The Query using a data connection: GetUserProfileByName is extremely simple.  You just click Add Action and choose Query using a data connection in the Action pulldown.  It then gives you another pulldown of data connections where you choose GetUserProfileByName.  That’s it.

The first rule requires some direct attention, because it is where the magic happens for this entire blog entry.  It looks simple and actually is simple, but it’s the part that people never think of or just don’t realize it can be done.  All we are doing is setting the AccountName field to the current field’s data.  Ok, so what is this AccountName field?  We never created such a thing!  Ah, well it’s the only node in the queryFields group of the GetUserProfileByName data connection.  We are taking the Manager’s username from strSubmitterMgr and sending it to this field just before querying that web service.  This sends the Manager’s username to the web service so that it will return the data set of profile information relevant to the Manager instead of the Submitter.  This is the key to getting information other than the current user’s!

Here’s how you do it (Fig 11).  Click Add Action.  In the Action pulldown, select Set a field’s value; in Value, select strSubmitterMgr (should show a dot afterwards); in Field, click the Select a Field or Group button.  In Data Source, choose GetUserProfileByName (secondary), then drill down through the queryFields nodes until you reach the AccountName node.  Select it and click OK.  Pretty simple, huh?


Fig 11 – Sending a new query value to the GetUserProfileByName web service

Form Load – For the form’s Open Behavior, you will set a rule with 8 actions, all of which you have done already in this blog entry (Fig 12).  Here is a quick list of the actions and their formulas

  1. strCurrentUser – Set field’s value to userName()
  2. AccountName – Set fields value to strCurrentUser
  3. Query GetUserProfileByName
  4. strCurrentUserEmail – Set field’s value to Value[Name = “WorkEmail”]
  5. strCurrentUserName – Set field’s value to Value[Name = “PreferredName”]
  6. strCurrentUserMgr – Set field’s value to substring-after(Value[Name = “Manager”], “\”)
  7. strCurrentUserMgrEmail – Set field’s value to NULL
  8. strCurrentUserMgrName – Set field’s value to NULL (setting these to NULL so that btnCurrentMgrInfo works properly without keeping saved data in these fields when re-opening)

These steps are sending the current user’s username to the GetUserProfileByName web service, which returns a data set of profile info that is used to populate three other fields of information about the current user – WorkEmail, PreferredName, and Manager.  This may be the same info as the submitter, but it can accommodate users other than the submitter.


Fig 12 – One rule with 12 actions to perform each time the form opens

The reason why we’re using the a default value on strSubmitter and a rule for strCurrentUser is because using a default value makes the data populate once and stay the same during subsequent edits.  Since our current user may not be the same as the submitter, we must use a rule when the form opens to set strCurrentUser to the current user’s username while the strSubmitter field will always have the original submitter’s username.  All of the Submitter fields populated above will remain static, because there is always only one submitter.  The CurrentUser fields will always be dynamic depending on who opens the form.

btnCurrentMgrInfo – This is the button labeled Get Current Manager Info.  This button will have one rule with 4 actions that are identical to the strSubmitterMgr rule above except that the data will be sent to different fields (Fig 13).  You start by setting the AccountName of the GetUserProfileByName web service to the username of the current user’s Manager.  You then query the web service with the Manager’s username, which returns a data set of profile information about the current user’s Manager.  You then set the current user manager fields to their respective values of WorkEmail and PreferredName.  This example is just illustrating how you can use a button to populate such info.


Fig 13 – One rule with 4 actions to perform on a button push

strSelectedUser – This example puts a lot of concepts together into one simple action of choosing a dropdown selection.  You start by changing your strSelectedUser control to a dropdown box (the field next to Choose User).  You then configure the dropdown to pull data from the UserNames list (Fig 14).  First, you choose the radio button for Look up Values from an External Data Source.  In the Data Souce, choose UserNames.  In Entries, click the button and select the UserNames repeating group, then click Ok.  For Value, choose the UserName node, and for Display Name, choose the FullName node.  What this is going to do is show the user some friendly Full Names, but the values behind those selections will be actual User Names.


Fig 14 – Configuring strSelectedUser as a dropdown bound to the UserNames list

Next, create one rule on strSelectedUser with 5 actions (Fig 15).  Again, these actions are now familiar, but we’re combining multiple steps into one rule and using one new concept.  We first set the web service’s AccountName node to the value of strSelectedUser, which if you recall is the actual User Name of the name chosen in the pulldown.  Next, we query the web service.  Then, we take the User Name of the Manager of the person selected and set the web service’s AccountName to this value.  Basically, we’ve iterated through the earlier processes in this blog entry without using separate data fields.  We now have yet another data set of profile info, which allows us to do the last step.  The last step is to set strSelectedUserMgr to the Full Name (FirstName concatenated with LastName) of the selected user’s Manager.  So think about it, we started with a user selected in a pulldown and jumped all the way to that user’s manager’s friendly Full Name all in one simple click.

For the 3rd action, remember to use this formula to get the Manager’s username: substring-after(Value[Name = “Manager”], “\”).  On the 5th step, use this new formula for concatenating the FirstName with the LastName (these are attributes from the web service): concat(Value[Name = “FirstName”], ” “, Value[Name = “LastName”]).


Fig 15 – Creating one rule with 5 actions on the strSelectedUser pulldown

The custom Submit button is optional, but if you’d like to use that concept, please use my other write-up on that topic: Auto-Generating Filenames for InfoPath Forms.

Test Functionality

Publish the form, go to the form library, then click New.  In my example, I’m logged into the browser with an account named SharePoint Tester, and I am its manager.  The form should be completely populated in the Submitter section, and it should be partially completed in the CurrentUser section.  Notice the info is the same due to the fact that you are the submitter AND the current user, since you created this form as new.  The Current User Manager info is not populated, because we have to push the button to populate it.  The Selected User section is blank, because we have select a user from the pulldown first (Fig 16).


Fig 16 – Testing a new form

Submit your form, then re-open it with a different user account.  In my example, I started with a tester account and then logged in as myself to view the submitted form.  Notice that the Submitter information hasn’t changed, but the CurrentUser info now reflects the new user’s info, including that user’s manager’s username.  Click on the Get Current Manager Info button and watch the next two fields get populated with the Current User’s Manager’s information (Fig 17).


Fig 17 – Current User info is dynamic and a button can be used to retrieve user profile info

For the last test, we will make a selection in the Choose User pulldown and see what happens.  Choose one of the names in your pulldown and see if it populates the Selected User Manager field with that person’s manager’s full name (Fig 18).


Fig 18 – Use the value from a pulldown to determine that user’s manager’s Full Name

Posted in InfoPath 2007, MOSS 2007 | Tagged: , , , , , , , , | 336 Comments »