

This does not contain separate information, but I wanted it to show up for people doing searches while trying to figure out how to get Manager information from Active Directory. I see this question a lot, and it is touched on in great detail in this blog entry: InfoPath – Get user information without writing code (extended). That entry contains additional info, so I just wanted to get this blog title out there for people to find.
Archive for the ‘MOSS 2007’ Category
Things related specifically to Microsoft Office SharePoint Server 2007
InfoPath – Get Manager Information
Posted by Clayton Cobb on June 21, 2009
Posted in InfoPath 2007, MOSS 2007 | Tagged: active directory, browser, browser forms, browser-enabled, GetUserProfileByName, infopath, moss, sharepoint, UserProfileService | 14 Comments »
InfoPath – Get user information without writing code (extended)
Posted by Clayton Cobb on June 21, 2009
In terms of free, out-of-the-box functions, I consider the UserProfileService to be the most powerful thing that can be used in SharePoint-based InfoPath forms. Itay Shakury made this wonderful blog post over two years ago that told us how to Get the current user without writing code. That blog post is so popular that Itay is still answering questions as recently as TODAY (June 20th, 2009). What we will talk about today is how to take this concept and extend it further so that you can get any profile info for any user by querying within the form after it has been opened through rules triggered by changed fields and buttons. One specific example will be to use the Manager node to get the manager’s additional info. Let’s begin…
Note: The following assumes you have already implemented the UserProfileService solution above, specifically the GetUserProfileByName method…
Another Note: The UserProfileService does NOT touch Active Directory. It only touches the Profile Database, which is part of the SSP, so it requires you to be importing profiles through the SSP to populate this database, because that’s where all the information comes from. The profile import pulls data from Active Directory, so it’s like connecting to AD, but not directly. Therefore, this web service is only available through MOSS and not WSS 3.0. For anyone who would like to do the same things but without having this web service, please consider using the Qdabra Active Directory Web Service that can be used in any type of InfoPath form as long as the organization uses Active Directory.
This write-up will be very involved, so in order to keep it from being 20 pages long, I’m going to explain certain concepts in detail ONCE, and then I will refer to that concept multiple times later without having to show more screenshots. Hopefully, that works. The 4 main ways we will be using the UserProfile Service:
- Populating default information upon form load
- Populating queried information with a button
- Populating queried information with a dropdown tied to a secondary data connection
- Getting Manager info
These are the steps we’ll take:
- Create form template with all relevant data elements
- Create layout table showing data groupings
- Create form library
- Create UserName custom list
- Create Data Connections – GetUserProfileByName web service, AutoFilename library Submit, and UserName list Receive
- Configure all fields and buttons – default values and rules
- Test Functionality
Create form template with all relevant data elements
You won’t need all of these for every form, but they are elements that I use for achieving some of the concepts. We’re combining all of the concepts, so you can either pick out what you need or build it all for practice, and then apply bits and pieces where applicable on your existing and future forms. The element names should be self-explanatory, so I’ll just use a screenshot to show you what should be built in the main data source (Fig 1)
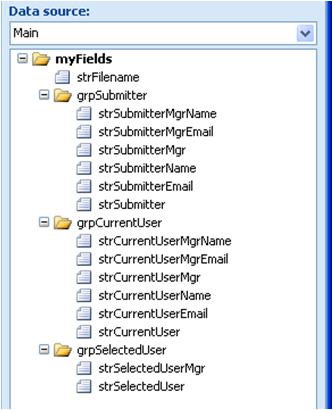
Fig 1 – Form template showing all relevant data elements
Create layout table showing data groupings
In reality, you won’t end up showing most of these fields on the canvas of your forms, but they are showing here for testing and demonstration purposes. I recommend hiding most of the fields like the ones showing usernames and instead showing meaningful ones like the name fields. Again, the picture should be self-explanatory up front, so just follow this structure (Fig 2). Add a row for that custom button, then just drag the button to the canvas and rename it. We will configure it later. Also, do the same for the Submit and Close (optional) buttons below the table.
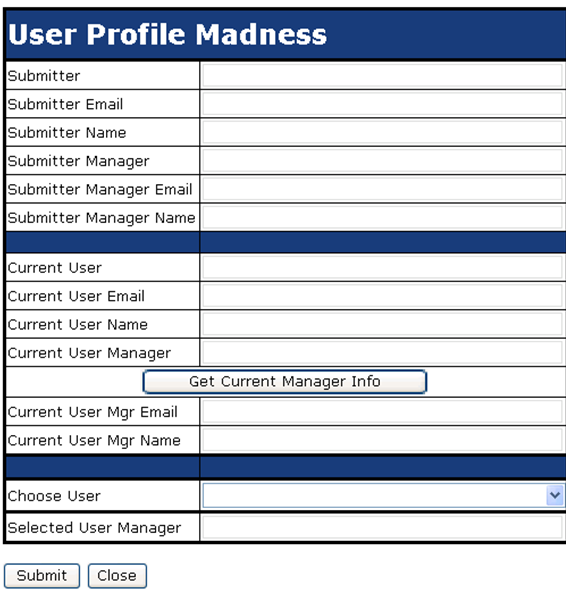
Fig 2 – Creating the layout table
Create form library
Create a basic Form Library on your SharePoint site. Go to Form Settings > Library Settings > Advance Settings > Display as Web Page (optional).
Create UserName custom list
Create a Custom List on your SharePoint Site. Change the Title column to UserName, and create another column named FullName. Populate this list with 3 known users (Fig 3) and be sure to use their exact username (i.e. ccobb) and not the domain name (i.e. domain\ccobb). For the Full Name, put whatever you prefer to use as a friendly name for that user.
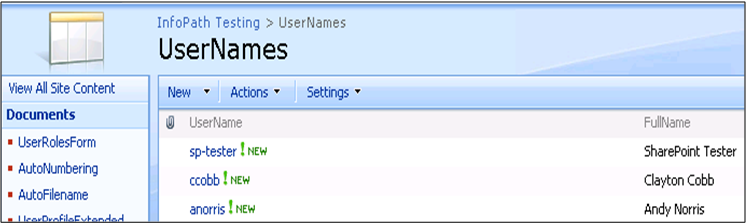
Fig 3 – Creating the custom UserName list
Create Data Connections – GetUserProfileByName web service, AutoFilename library Submit, and UserName list Receive
Create 3 data connections (Fig 4) starting with the GetUserProfileByName web method from the first part of Itay’s blog entry.

Fig 4 – List of all Data Connections needed
Next, create the Submit data connection for submitting the form to your form library while using the strFilename data element (Fig 5). Ensure you select “Allow overwrite if file exists.”

Fig 5 – Submit using strFilename
Lastly, create a Receive data connection for retrieving the list of pre-defined usernames and full names. Be sure to select those two nodes when connecting to the list (Fig 6)

Fig 6 – Retrieve UserName and FullName from custom list
Configure all fields and buttons – default values and rules
There is a lot of work to do here, so bear with me. I’ll try to consolidate the similar settings to hopefully make it quicker to read and do. We have logic built in 5 places (not including the Submit and Close buttons):
- strSubmitter – Default value and rules for setting other field values
- strSubmitterMgr – Queries web service and a rule for setting other field values
- Form Load – A rule for setting field values
- btnCurrentMgrInfo – A rule for setting other field values
- strSelectedUser – Bound to secondary data connection as a dropdown list, multiple web service queries, and actions for setting other field values. This field puts it all together into one action.
strSubmitter – Set the default value for this data element to the function userName() (Fig 7).

Fig 7 – Setting strSubmitter default value to userName()
Create a rule with 3 actions that sets the values of the other 3 submitter fields (Fig 8). Each action starts with “Set a field’s value,” but I have scrolled right to show the formulas. Each formula is from the 2nd half of Itay’s blog entry. I will show how to do the strSubmitterMgr rule as one example to follow for all three (Fig 9). The actions HAVE to be in this order, or at least make sure that strSubmitterMgr is last in line. Due to there being no conditions, this rule fires as soon as strSubmitter is populated by the userName() default value.
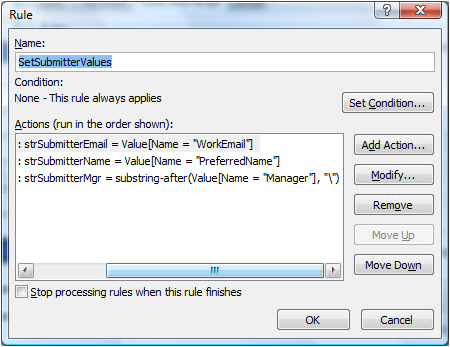
Fig 8 – Create a rule with 3 actions for strSubmitter
The formula for strSubmitterMgr is substring-after(Value[Name = “Manager”], “\”). The Xpath for that statement in my form is substring-after(xdXDocument:GetDOM(“GetUserProfileByName”)/dfs:myFields/dfs:dataFields/s0:GetUserProfileByNameResponse/s0:GetUserProfileByNameResult/s0:PropertyData/s0:Values/s0:ValueData/s0:Value[../../../s0:Name = “Manager”], “\”). I chose this for the example, because it is the most complicated. It is using the substring-after function to strip out all the data that comes after the backslash, because the value that returns for “Manager” is a full domain name (i.e. domain\ccobb). We only want the username (i.e. ccobb), thus the substring-after function. If you built your form exactly like mine, then you can click the Edit Xpath button and paste in the Xpath statement above. However, that would not teach you how to use the GUI to achieve this goal, and your forms won’t always follow this format, so this is how you create that formula (Fig 9).
- Set the Action to “Set a field’s value.” Select strSubmitterMgr in the Field box. In the Value box, click the function button (fx). In the Formula box, type substring-after(, “\”) – copy and paste if you’d like. Then, put your cursor before the comma and click Insert Field or Group.
- In Data Source, select GetUserProfileByName (secondary). Drill all the way down through the dataFields groups until you get to the Value node. Select the Value node, then click Filter Data.
- Click Add
- In the first dropdown, click select field or group. From there, do the same thing you did in step 3 above. Get back to the GetUserProfileByName data source and drill down until you see the Name node. Select that node, set the operand to is equal to, then set the last pulldown to the text of “Manager”
If done properly, then all of those boxes should look like Figure 9. Follow the same procedure for the other two fields in Figure 8 except for the substring-after function. Hint: at the Insert Formula screen, you can copy that statement and paste it in the same box when configuring other fields. You can then double click the Value[Name = “Manager”] part that is underlined and click through the settings to change the Name part of step 5.

Fig 9 – Creating the strSubmitterMgr formula to retrieve just the Manager’s username
strSubmitterMgr – As soon as the 3rd action from above completes for populating strSubmitterMgr, it is time to fire off another rule with 4 actions (Fig 10). The first 2 actions have to be in that order, and they have to be first. The last 2 actions are interchangeable. Be sure to place these rules on the strSubmitterMgr field and not the strSubmitter field!
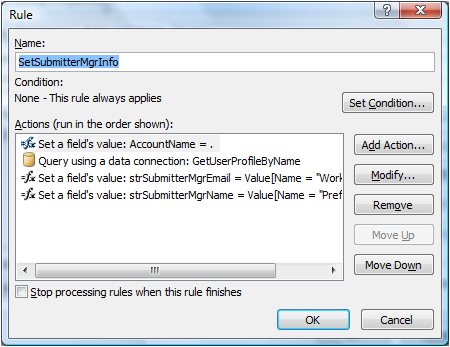
Fig 10 – Create a rule with 4 actions for strSubmitterMgr
You already know how to do the last two actions, because they are exactly the same as the strSubmitter actions. Just be sure to remember and set the field values for strSubmitterMgrEmail and strSubmitterMgrName. We’ll now focus on the first two actions. The Query using a data connection: GetUserProfileByName is extremely simple. You just click Add Action and choose Query using a data connection in the Action pulldown. It then gives you another pulldown of data connections where you choose GetUserProfileByName. That’s it.
The first rule requires some direct attention, because it is where the magic happens for this entire blog entry. It looks simple and actually is simple, but it’s the part that people never think of or just don’t realize it can be done. All we are doing is setting the AccountName field to the current field’s data. Ok, so what is this AccountName field? We never created such a thing! Ah, well it’s the only node in the queryFields group of the GetUserProfileByName data connection. We are taking the Manager’s username from strSubmitterMgr and sending it to this field just before querying that web service. This sends the Manager’s username to the web service so that it will return the data set of profile information relevant to the Manager instead of the Submitter. This is the key to getting information other than the current user’s!
Here’s how you do it (Fig 11). Click Add Action. In the Action pulldown, select Set a field’s value; in Value, select strSubmitterMgr (should show a dot afterwards); in Field, click the Select a Field or Group button. In Data Source, choose GetUserProfileByName (secondary), then drill down through the queryFields nodes until you reach the AccountName node. Select it and click OK. Pretty simple, huh?

Fig 11 – Sending a new query value to the GetUserProfileByName web service
Form Load – For the form’s Open Behavior, you will set a rule with 8 actions, all of which you have done already in this blog entry (Fig 12). Here is a quick list of the actions and their formulas
- strCurrentUser – Set field’s value to userName()
- AccountName – Set fields value to strCurrentUser
- Query GetUserProfileByName
- strCurrentUserEmail – Set field’s value to Value[Name = “WorkEmail”]
- strCurrentUserName – Set field’s value to Value[Name = “PreferredName”]
- strCurrentUserMgr – Set field’s value to substring-after(Value[Name = “Manager”], “\”)
- strCurrentUserMgrEmail – Set field’s value to NULL
- strCurrentUserMgrName – Set field’s value to NULL (setting these to NULL so that btnCurrentMgrInfo works properly without keeping saved data in these fields when re-opening)
These steps are sending the current user’s username to the GetUserProfileByName web service, which returns a data set of profile info that is used to populate three other fields of information about the current user – WorkEmail, PreferredName, and Manager. This may be the same info as the submitter, but it can accommodate users other than the submitter.

Fig 12 – One rule with 12 actions to perform each time the form opens
The reason why we’re using the a default value on strSubmitter and a rule for strCurrentUser is because using a default value makes the data populate once and stay the same during subsequent edits. Since our current user may not be the same as the submitter, we must use a rule when the form opens to set strCurrentUser to the current user’s username while the strSubmitter field will always have the original submitter’s username. All of the Submitter fields populated above will remain static, because there is always only one submitter. The CurrentUser fields will always be dynamic depending on who opens the form.
btnCurrentMgrInfo – This is the button labeled Get Current Manager Info. This button will have one rule with 4 actions that are identical to the strSubmitterMgr rule above except that the data will be sent to different fields (Fig 13). You start by setting the AccountName of the GetUserProfileByName web service to the username of the current user’s Manager. You then query the web service with the Manager’s username, which returns a data set of profile information about the current user’s Manager. You then set the current user manager fields to their respective values of WorkEmail and PreferredName. This example is just illustrating how you can use a button to populate such info.
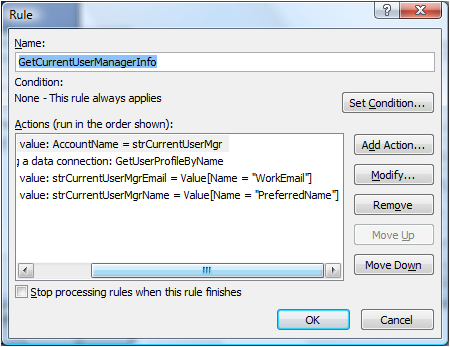
Fig 13 – One rule with 4 actions to perform on a button push
strSelectedUser – This example puts a lot of concepts together into one simple action of choosing a dropdown selection. You start by changing your strSelectedUser control to a dropdown box (the field next to Choose User). You then configure the dropdown to pull data from the UserNames list (Fig 14). First, you choose the radio button for Look up Values from an External Data Source. In the Data Souce, choose UserNames. In Entries, click the button and select the UserNames repeating group, then click Ok. For Value, choose the UserName node, and for Display Name, choose the FullName node. What this is going to do is show the user some friendly Full Names, but the values behind those selections will be actual User Names.

Fig 14 – Configuring strSelectedUser as a dropdown bound to the UserNames list
Next, create one rule on strSelectedUser with 5 actions (Fig 15). Again, these actions are now familiar, but we’re combining multiple steps into one rule and using one new concept. We first set the web service’s AccountName node to the value of strSelectedUser, which if you recall is the actual User Name of the name chosen in the pulldown. Next, we query the web service. Then, we take the User Name of the Manager of the person selected and set the web service’s AccountName to this value. Basically, we’ve iterated through the earlier processes in this blog entry without using separate data fields. We now have yet another data set of profile info, which allows us to do the last step. The last step is to set strSelectedUserMgr to the Full Name (FirstName concatenated with LastName) of the selected user’s Manager. So think about it, we started with a user selected in a pulldown and jumped all the way to that user’s manager’s friendly Full Name all in one simple click.
For the 3rd action, remember to use this formula to get the Manager’s username: substring-after(Value[Name = “Manager”], “\”). On the 5th step, use this new formula for concatenating the FirstName with the LastName (these are attributes from the web service): concat(Value[Name = “FirstName”], ” “, Value[Name = “LastName”]).
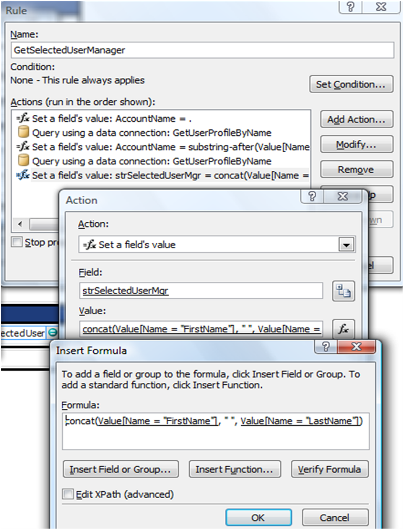
Fig 15 – Creating one rule with 5 actions on the strSelectedUser pulldown
The custom Submit button is optional, but if you’d like to use that concept, please use my other write-up on that topic: Auto-Generating Filenames for InfoPath Forms.
Test Functionality
Publish the form, go to the form library, then click New. In my example, I’m logged into the browser with an account named SharePoint Tester, and I am its manager. The form should be completely populated in the Submitter section, and it should be partially completed in the CurrentUser section. Notice the info is the same due to the fact that you are the submitter AND the current user, since you created this form as new. The Current User Manager info is not populated, because we have to push the button to populate it. The Selected User section is blank, because we have select a user from the pulldown first (Fig 16).

Fig 16 – Testing a new form
Submit your form, then re-open it with a different user account. In my example, I started with a tester account and then logged in as myself to view the submitted form. Notice that the Submitter information hasn’t changed, but the CurrentUser info now reflects the new user’s info, including that user’s manager’s username. Click on the Get Current Manager Info button and watch the next two fields get populated with the Current User’s Manager’s information (Fig 17).

Fig 17 – Current User info is dynamic and a button can be used to retrieve user profile info
For the last test, we will make a selection in the Choose User pulldown and see what happens. Choose one of the names in your pulldown and see if it populates the Selected User Manager field with that person’s manager’s full name (Fig 18).
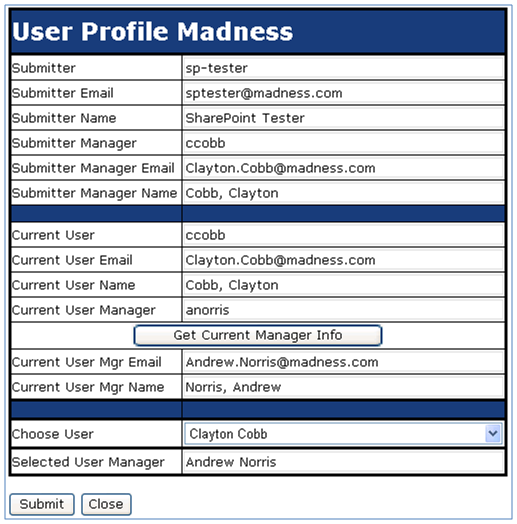
Fig 18 – Use the value from a pulldown to determine that user’s manager’s Full Name
Posted in InfoPath 2007, MOSS 2007 | Tagged: active directory, browser, browser forms, browser-enabled, GetUserProfileByName, infopath, moss, sharepoint, UserProfileService | 336 Comments »
Auto-Generating Filenames for InfoPath Forms
Posted by Clayton Cobb on June 20, 2009
Auto-Generating Filenames for InfoPath Forms – I see this topic come up a LOT on forums all over the place, so instead of continuing to answer the question time and time again, I am going to post a quick blog entry showing the steps. I think this stuff is fairly simple, but it just doesn’t pop into your head initially. Once you see it and understand it, you’ll think it’s simple, too. Keep in mind that I focus entirely on SharePoint-based InfoPath forms and for the most part BROWSER-ENABLED forms. So, it’s possible and likely that all concepts explained here will work for non-browser forms and non-SharePoint forms, but just remember that my perspective is mostly browser-enabled. The basis for this topic is that the standard method for submitting InfoPath browser-enabled forms is for the user to click Save at which point the user is prompted to give a filename along with choosing to allow overwrite. I really dislike this feature, because users have no concept of proper naming convention for the most part, and there’s no way to guarantee they create a unique or meaningful filename. I also just don’t like the user getting prompted. I prefer for the user to just click a button that saves the file to SharePoint with a dynamically-defined filename, closes the form, and takes the user back to the forms library. Ok, so how do we do ensure these few things:
- The filename must be unique
- The filename must persist through subsequent edits of the form without the user having to do anything
- The built-in toolbar buttons must be hidden
- A custom button must be created to do it all
Here are the steps:
- Create the field for storing the filename
- Create the Submit data connection that uses this field
- Disable the browser-based toolbar functions
- Create the custom submit button
Create a hidden field for storing filename
Create a strFilename field (Text). Do not set any conditional formatting, rules, or data validation on this. Add it to the canvas for now and make it read-only (Fig 1). This will be visible for testing purposes only.

Fig 1 – Create hidden field named strFilename
Create a Submit data connection that uses the strFilename field for dynamically creating the filename
Create a SUBMIT data connection in your form template that connects to the Form Library where the form resides. Put in the URL of your Form Library for the “Document Library” field, and choose the strFilename data element for “File name” field by using the fx button. Check the box for “Allow overwrite if file exists” (Fig 2).

Fig 2 – Creating the Submit data connection for the Form Library
Disable toolbar options
Click Tools > Form Options > Browser. Uncheck Save, and Save As (Fig 3). Submit should be grayed since it has not been configured. If it has been configured, be sure it is unchecked. Update should be unchecked by default, so leave it. I personally uncheck “Views,” since I use views to dynamically route people to certain information based off their identity or the form’s workflow status, but it’s up to you. If your form is not browser-enabled, use the Open and Save menu in Form Options to uncheck Save and Save As.

Fig 3 – Disabling toolbar functions for Browser-Enabled Forms
Create the custom Submit button
Drag a button control to your canvas and double-click it to get to its properties. Change the display name to “Submit” or whatever you prefer, then click Rules. You want to add two rules, each with one condition (Fig 4).

Fig 4 – Custom Submit button with two rules
The first rule allows you to Edit the existing form without changing strFilename, then close it (Fig 5).
- Set a condition rule to have one condition stating that strFilename is not blank.
- Add two actions in this order:
- Submit to your SharePoint Library Submit data connection
- Close

Fig 5 – Editing the form with the submit data connection
Here, we are simply submitting the form back to the library in a manner that will not change any metadata and will overwrite the existing file of the same name. This is the whole reason for the strFilename field. We do not want the strFilename to be recreated each time the form is edited. This rule is placed before the Submit rule for the same reason as stated above. We need to check first to see if the form has already been submitted. If so, then we submit using the current strFilename. If not, then we skip this rule.
The second rules will Submit the current form only if it is brand new and after dynamically creating the strFilename, then it closes the form.
- Set a condition rule to have one condition stating that strFilename is blank.
- Add three actions in this order:
- Set the Value of strFilename (Fig 6) to the concatenated string combining userName() with now(). The formula is concat(userName(), now()). The Xpath is concat(xdUser:get-UserName(), xdDate:Now()). Note: I add a text hyphen in the middle to make it a little easier to read, but that’s up to your discretion.
- Submit to your SharePoint Library Submit data connection
- Close

Fig 6 – Setting the dynamic filename prior to submission
Here, we are submitting the form to the form library for the first time. This is why we first dynamically create the strFilename, because the Submit data connection uses this field to create the filename in SharePoint. We only want to do this step upon first submission, so that is why this rule only runs if the strFilename is blank. Doing this rule last keeps us from double-submitting, because the Edit rule would run right after the Submit rule due to its condition being met (strFilename is not blank). You can of course choose any concatenation formula you want as long as it is unique. This particular formula can only create a non-unique filename if the same user submits two separates forms (two browser forms open simultaneously) at the same EXACT second.
Publish your form to a new form library, and set that library to Display in Browser (Advanced Settings). Click New to create a new form (Fig 7)

Fig 7 – A new form before submission
Click submit, and it should take you back to the library with no prompts or delays. You will see a new form with a unique filename (Fig 8). The now() function gives the date AND time separate by the letter “T.”

Fig 8 – Newly-created form has unique filename
Click on that new form and notice that the strFilename field has been populated with the same info you saw for the filename in the library (Fig 9). This field is actually populated FIRST when you submit, because it forms the basis for the filename in the Submit data connection. Click submit again and notice that the existing file has been changed rather than a new file being created.

Fig 9 – strFilename field is populated with the dynamic, unique filename
Reference links for related articles:
InfoPath Submit Error- A value in the form may be used to specify the file name – You may be getting this error. This blog post helps explain why, and my blog post helps explain how to overcome it.
Posted in InfoPath 2007, MOSS 2007 | Tagged: automatic filename, browser forms, browser-enabled, infopath, moss, sharepoint | 171 Comments »
Auto-Numbering InfoPath Forms
Posted by Clayton Cobb on June 15, 2009
How do I avoid getting NaN when using the max() function? There is already a blog post referencing this, but people seem to be having trouble with it, so I am going to explain the steps in detail with screenshots. Here are the steps that SYM Wong-A-Ton gave:
- Change the RetrieveIDs data connection to use the autonumber field instead of max(@ID) + 1.
-
Add a Button to the form with the following 4 rules:
- Query the RetrieveIDs data connection
- Set the autonumber field equal to 1 when count(@ID) = 0
- Set the autonumber field equal to max(@ID) + 1 when count(@ID) > 0
- Submit the form to the form library
- Disable the submitting of the form via the Submit button on the toolbar (the Button you added will submit the form instead)
These steps make sense, but you have to know how to actually configure your button settings to match the words. I think some more steps are needed, so here is my outline:
- Create RetrieveIDs data connection
- Create hidden fields for storing the ID and Filename
- Create a Submit data connection for your that uses Filename field for submit filename
- Disable toolbar options
- Create custom button with 5 rules
Create RetrieveIDs data connection Create a RECEIVE data connection in your form template that connects to the Form Library where the form resides. Unless you want other metadata from this library, only select the ID field when configuring the DC. On the last page, make sure to deselect the checkbox for “Automatically retrieve data when form is opened.” We want to retrieve the data at the exact moment before submitting the form just in case someone else has submitted a form while our form was open (Fig 1).

Fig 1 – Data connection to retrieve IDs from the SharePoint List
Create hidden fields for storing the ID and Filename Create a numID field (Whole Number) and strFilename field (Text). Do not set any conditional formatting, rules, or data validation on these. Add them to the canvas for now and make them read-only (Fig 2). These will be visible for testing purposes only.
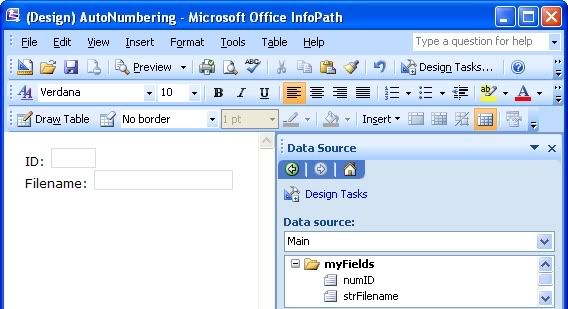
Fig 2 – Create hidden fields for ID and Filename
Create a Submit data connection that uses the strFilename field for dynamically creating the filename Create a SUBMIT data connection in your form template that connects to the Form Library where the form resides. Put in the URL of your Form Library for the “Document Library” field, and choose the strFilename data element for “File name” field by using the fx button. Check the box for “Allow overwrite if file exists” (Fig 3).
Fig 3 – Creating the Submit data connection for the Form Library
Disable toolbar options Click Tools > Form Options > Browser. Uncheck Save, and Save As (Fig 4). Submit should be grayed since it has not been configured. If it has been configured, be sure it is unchecked. Update should be unchecked by default, so leave it. I personally uncheck “Views,” since I use views to dynamically route people to certain information based off their identity or the form’s workflow status, but it’s up to you. If your form is not browser-enabled, use the Open and Save menu in Form Options to uncheck Save and Save As.
Fig 4 – Disabling toolbar functions for Browser-Enabled Forms
Create custom button with 5 rules

Fig 5 – The full view of the 5 Rules
- 1) Query the RetrieveIDs data connection (Fig 6)

Fig 6 – Querying the RetrieveIDs data connection
-
2) Set numID to the the next incremental ID only with two conditions – there is at least one form already existing in the library and only if the current form has not already been submitted (Fig 7)
-
Set a condition rule to have two conditions
- For the first, click “Select a field or group,” select the RetrieveIDsdata source from the top pulldown, drill down to the IDdata element, and choose “Number of occurrences of ID” in the bottom pulldown. Select the operand “is greater than” and type the number 0 in the last box.
- For the second condition, simply choose strFilename in the first pulldown and set the operand to “is blank.”
-

Fig 7 – Setting the incremental ID with conditions
- Create one action that sets numID to the next number higher than the highest ID in the form library (Fig 8). For the Action, choose “Set a field’s value.” For the Field, choose numID. For Value, click the fx button and put in the formula max(@ID) + 1(do not copy and paste this – you must use the Insert Function and Insert Field buttons to make sure it resolves properly. You can also copy this Xpath string: xdMath:Max(xdXDocument:GetDOM(“RetrieveIDs”)/dfs:myFields/dfs:dataFields/dfs:AutoNumbering/@ID) + 1

Fig 8 – Setting the ID to the next incremental value
What we are accomplishing here is that we are giving our current form the next ID in line before submitting the form. We are making sure this rule only runs when the library is not empty, because it would cause an error when there is no ID to use for the max(ID) function. Also, we are only setting this value when the form is brand new, which means it has no strFilename yet. We have to do this so that if the form is edited, there will be no change to the numID field. We only want this rule to run when the library is not empty and when the form is brand new.
-
3) Set numID to 1 upon the single condition that the form library is empty (Fig 9).
- Set a condition rule to have one condition. Click “Select a field or group,” select the RetrieveIDsdata source from the top pulldown, drill down to the IDdata element, and choose “Number of occurrences of ID” in the bottom pulldown. Select the operand “is equal to” and type the number 0 in the last box.

Fig 9 – Setting the Initial ID with a condition
-
- Create one action that sets numID to 1 (Fig 10)

Fig 10 – Setting the ID to 1 for the first form in the library
What we are accomplishing here is that we are giving our form the first ID of “1” due to the fact that it is the first form to be submitted to the library. This is only possible when the form is brand new, so there is no need to add a condition related to the strFilename. All we need to do is check to see if the form library is empty. This step circumvents the NaN error when using max(ID) and getting a null value back. Also, notice that this rule is put in line AFTER the Set Next ID step above. The reason for this is because both rules would run if they were in the opposite order, and you’d be skipping IDs.
-
4) Edit the existing form without changing numID or strFilename, then close it (Fig 11).
- Set a condition rule to have one condition stating that strFilename is not blank.
-
Add two actions in this order:
- Submit to your SharePoint Library Submit data connection
- Close
Fig 11 – Editing the form with the submit data connection
Here, we are simply submitting the form back to the library in a manner that will not change any metadata and will overwrite the existing file of the same name. This is the whole reason for the strFilename field. We do not want the strFilename to be recreated each time the form is edited. This rule is placed before the Submit rule for the same reason as stated above. We need to check first to see if the form has already been submitted. If so, then we submit using the current strFilename. If not, then we skip this rule.
-
5) Submit the current form only if it is brand new and after dynamically creating the strFilename, then close it.
- Set a condition rule to have one condition stating that strFilename is blank.
-
Add three actions in this order:
- Set the Value of strFilename (Fig 12) to the concatenated string combining userName() with the numID field. The formula is concat(userName(), numID). The Xpath is concat(xdUser:get-UserName(), my:numID).
- Submit to your SharePoint Library Submit data connection
- Close

Fig 12 – Setting the dynamic filename prior to submission
Here, we are submitting the form to the form library for the first time. This is why we first dynamically create the strFilename, because the Submit data connection uses this field to create the filename in SharePoint. We only want to do this step upon first submission, so that is why this rule only runs if the strFilename is blank. Doing this rule last keeps us from double-submitting, because the Edit rule would run right after the Submit rule due to its condition being met (strFilename is not blank). You can of course choose any concatenation formula you want, or you can use no formula and simply use the numID value – this part is up to you. After publishing the form template, go to your library, which should be empty with no files ever having been submitted (Fig 13), otherwise the ID of the actual files in the library won’t start with 1, and the InfoPath numID won’t match the SharePoint ID.

Fig 13 – In your new Form Library with no history of records, click New
The new, blank form should look like this (Fig 14):

Fig 14 – Blank version of the form
Click Submit, and you should be returned to the library showing just one file (Fig 15), and it should have the Name of username1 (i.e. ccobb1).

Fig 15 – First list item is correctly given the ID of 1
Click on that file to re-open it, and it should show the populated fields with numID = 1 and strFilename = ccobb1 (Fig 16).

Fig 16 – Form data fields show proper ID and Filename after submission
Click Submit again, and notice that you go back to the form library, but nothing has changed on the form except the Modified date/time stamp. The ID did not increment, and a new file was not created, because we were just editing the same file. Now, click New again, and submit. You should see a new file with a Name that is equivalent to ccobb2. Do this several times and edit some of those forms several times to ensure they all behave properly. There is one big problem with all of this, though, and I’ll demonstrate it for you. This entire concept works well UNLESS all the forms get deleted so that there are no forms remaining. If you do that, then the next form you create will be given the numID of 1 and the strFilename of ccobb1. However, in SharePoint, the ID will be the next highest ID in succession after the highest ID that had been created and subsequently deleted. Deleting files in a SharePoint list does not re-start the ID increment, so keep that in mind. If you delete all but one of your forms, then the numID solution we have here continues to work. Here is an pic showing what happens if you delete all but one of the forms and then create a new one (Fig 17).

Fig 17 – AutoNumbering continues even after records have been deleted as long as there is at least one record in the library
Three other major concerns are the scalability issue, the View settings issue, and the heavy use issue.
- Scalability – The data connection is pulling down the ID of every form in the main view of your form library. What if you have hundreds or thousands of forms? You will be pulling down tons of info that will slow the form load when all you need is a single piece of info – the highest ID in the list. A potential workaround for this is to create a custom view that is set to Sort by Created in Descending Order with a finite Item Limit of 1 (Fig 18). This always show only ONE item, and that will be the item with the highest ID in the entire list, because IDs are assigned upon creation of the file, so the most recently created file will have the highest ID. The problem then becomes that you need to create a data connection directly to this view instead of the library itself (DCs to SP lists use the default view). To do this, you must create an XML data connection pointing to the XML view of that SP view by using this write-up: Populating Form Data from SharePoint List Views. Believe me, this works, and I use it all the time, but I can imagine if it seems daunting to people who are just trying to figure out the entire solution above. To be clear, this DC would replace your RetrieveIDs DC from step 1.

Fig 18 – View Settings for showing only the list item with the highest ID#
- View Settings – Similar to the above issue, the Max(ID) function is only going to return the highest ID that InfoPath sees in the default view. The default view settings for a form library are to limit the items to 100. Also, any filtering on the default view would potentially cause InfoPath not to see every ID. You either have to make sure your default view has EVERY list item visible with no Item limit, or you need to use the above alternative view that shows only the highest ID form.
- Heavy Use – By heavy use, I mean that new forms are being created very frequently – enough that there is the potential for multiple people to submit new forms within the same moments (the window of time depends on the speed of the system), because this method relies on being able to read the items in the library to get the current Max(ID). If both get submitted close enough together, there is a chance that they assign themselves the same ID or that the submit fails altogether. It’s best to submit the doc, retrieve the ID after submission, then submit again (all in one button push), but this only works if you don’t need the ID itself in the filename.
Posted in InfoPath 2007, MOSS 2007 | Tagged: auto-number, browser, browser-enabled, ID, infopath, moss, sharepoint | 134 Comments »
User Roles in Browser-Enabled InfoPath Forms Using Contacts List
Posted by Clayton Cobb on June 14, 2009
MAJOR REVISION that uses the GetCommonMemberships web method to determine group memberships for users without needing to use contact lists or any other manual data source!
InfoPath – User Roles in Browser-Enabled Forms Using Groups
So, you need to restrict certain controls in your InfoPath form, but it’s browser-enabled, and you just found out that User Roles are not supported, huh? You also see that SharePoint permissions do not help restrict specific areas within your form, so what do you do? There are probably several methods, but here is the one I have come up with that uses all built-in functions of InfoPath and MOSS 2007 without any code.
Here is an outline of the steps with the assumption that you already have a working, browser-enabled form:
- Contacts List
- Add GetUserProfileByName data connection to your form template if not already using it
- Add necessary fields to form template and configure them
- Add conditional formatting to applicable controls
Contacts List
In this solution, the Contacts list will provide the groupings of users for your “roles” within the form.. Here are the steps:
- Create a new Contacts List
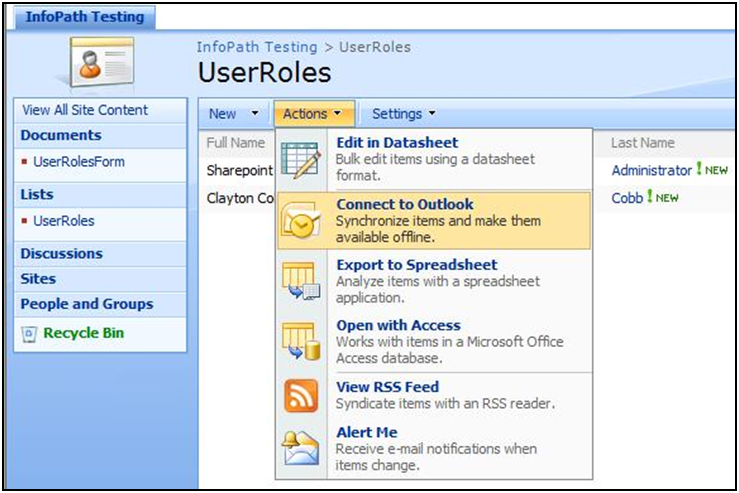
- Click Actions > Connect to Outlook (this step only for Office 2007/IE 6-8 users) – Fig 1
- Populate users from Global Address Book (or manually) – Fig 2 and 3
- Add any extra columns for sub-grouping of users (i.e. Department)

Fig 1 – Connecting to Outlook

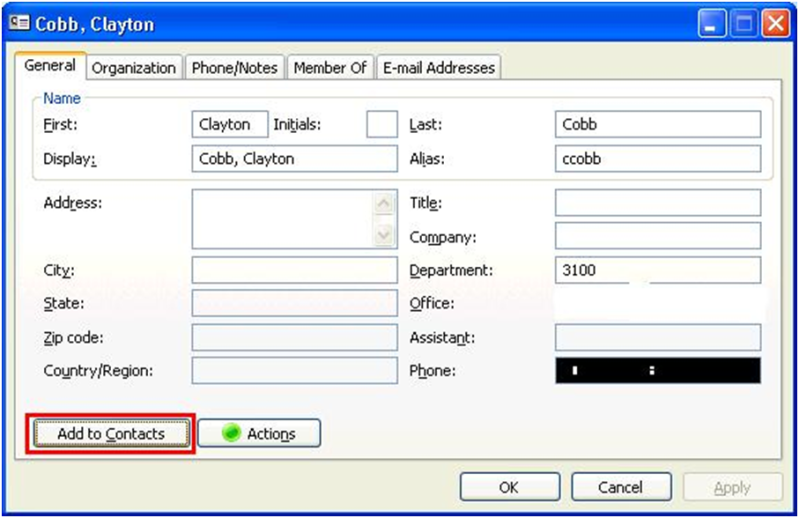
Fig 2 – Add Contact from Global Address Book in Outlook

Fig 3 – Copy local Contacts to Synchronized SharePoint Contact List

Fig 4 – Final View of Contacts List Synchronized with Outlook
What we have done is used Outlook 2007’s two-way integration with SharePoint to ensure that our contact information in the SP Contacts List is exactly the same as what is in Active Directory, and since our profile import in this scenario is pulling from Active Directory, then our user information should all be synchronized. Notice that I’ve added a Department column to the Contacts list, because this info is in AD, the GAL, and in the SP profile database. Note: other data has been removed but would usually be seen here (email address, phone #, etc).
User Profile Service – GetUserProfileByName method
Now we must add this superb web service to our form template as a data connection. Please use the first 8 steps of Itay’s writeup to get this done as I can only give him credit for my extensive knowledge of this web service. Once you’ve added it successfully, we need to do a few things with it using the later steps in Itay’s blog.
Add Necessary Fields to Form Template and Configure Them
First, create two basic text fields in your main data source: strCurrentUserEmail and strCurrentUserDepartment. Next, drag two section controls to your canvas, and drag both text fields from above (Fig 5).
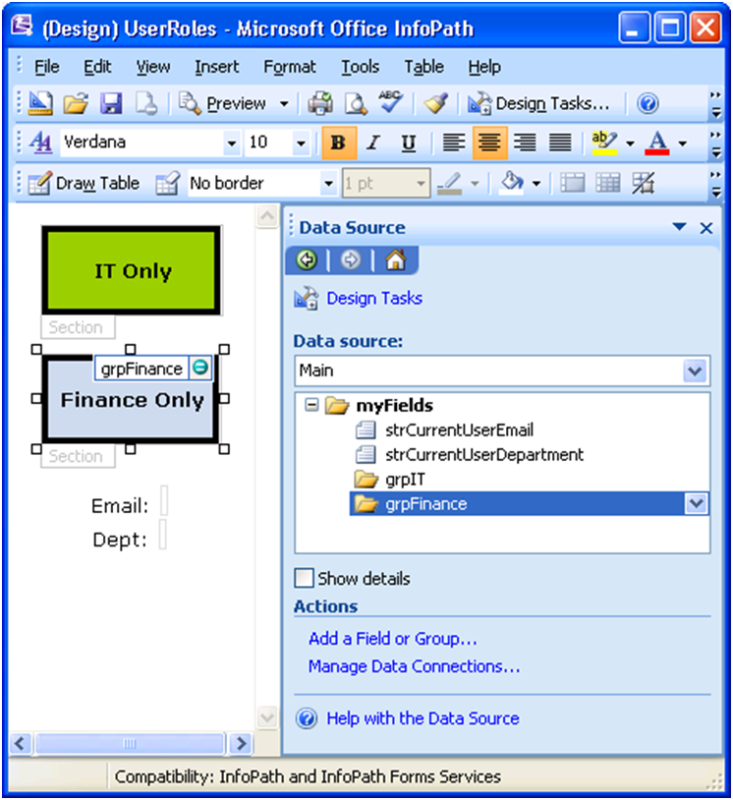
Fig 5 – Sample Form Template
Next, we need to get those fields populated with the proper information for only the current user, which means each subsequent user who opens the form will make the data in these fields change accordingly.
strCurrentUserEmail – Tools > Form Options > Open and Save > Rules. Add an action that sets the strCurrentUserEmail field to the WorkEmail value of the GetUserProfileByName data connection using the later steps from Itay’s writeup. It should look like this (Fig 6).
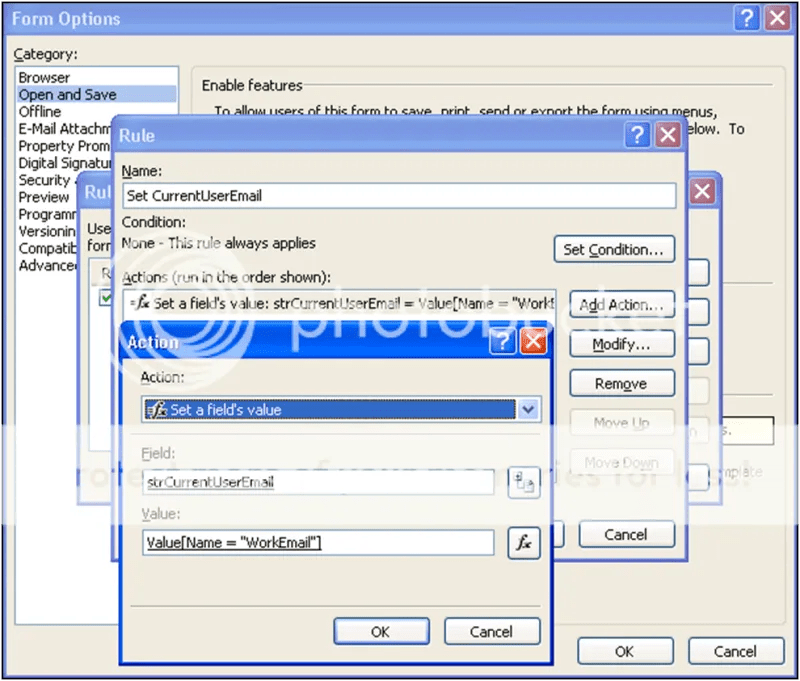
Fig 6 – Setting field to WorkEmail value
What this does is pull the WorkEmail value from the profile database for the user who just opened the form and puts that email address in our designated field. We could get this same value using the Default value function button on that field, but this would set the value once for the initial submitter and never change. I leverage this notion in another field named strSubmitterEmail so that I can also check to see if the current user is the original submitter.
strCurrentUserDepartment – Tools > Form Options > Open and Save > Rules. Add an action that sets the strCurrentUserDepartment field to the Department value of the GetUserProfileByName data connection the same way you did the previous step for WorkEmail. Note: You can add this action to the existing rule for email.
What this does is automatically pull the department of the current user and put it in the designated field.
Add Conditional Formatting to Applicable Controls
grpIT – Double-click this control on the canvas to get to its properties. Click Display > Conditional Formatting. Add a condition with two caveats. The first will check the contact list against the current user. The 2nd will check the contact list against the current user’s department.
- After clicking Add, click “Select a field or group” in the first dropdown. Change the data source to your Contact List, drill down to the data elements, click on E-mail_Address, and select “All occurrences of E-mail_Address” in the bottom dropdown (most people never notice this – Fig 7).

Fig 7 – Choosing All occurrences of a data connection field
For the operand, choose “are not equal to”, and for the last box, choose “Select a field or Group” again. From your main data source, select strCurrentUserEmail.
- Click the “And” button on the right to add another caveat to the condition. In this one, select strCurrentUserDepartment from your main data source in the first dropdown, “is not equal to” for the operand, and the text “IT” in the last dropdown. Be sure to change the “and” on the right to an “or,” and lastly check the box for “Hide this control.” It should look just like Figure 8.

Fig 8 – Conditional formatting to hide sections from unintended users
What we are essentially doing is checking to see if the current user is in the overall list of approved users, and then we are breaking it down further to see what department that person is in. If the current user is not in that list, then the section is hidden. If the person is in the list but not in the specified department, then the section is hidden. An alternative way to do the department filter is to make separate contact lists for each sub-group. If you do it that way, it requires more lists and more maintenance, but it allows you to assign a regular user as the owner of his/her respective list in order to maintain it (removes the burden from us). If you use one list with sub-categories, then you can’t as easily hand the maintenance over to regular users.
grpFinance – Do the same steps for this section as you did for grpIT except change the text “IT” to “Finance.” Note: Be sure that the text you type in situations like this is EXACTLY the same as what Active Directory shows. IT is not the same as it and Finance is not the same as finance.
Here is the final result. If you reference Figure 4 above, you will see that my department is shown as Finance…

Fig 9 – Finance user only sees the Finance section

Fig 10 – Manually changed Department to IT (demonstration purposes only)

Fig 11 – IT user only sees the IT section

Fig 12 – Log in as SharePoint Tester account

Fig 13 – SharePoint Tester not in Contacts list and sees nothing
**After it is all working, be sure to remove the text boxes from your form for strCurrentUserEmail and strCurrentUserDepartment, because they are only in this example for testing purposes. You want to make sure you can see the data that is being put in there during testing. Once it works, remove those text boxes, or if you want to show them, then make them read-only.
This is my first attempt at any blog post, so please feel free to critique and comment on any errors, bugs, typos, mistakes, fixes, questions, or confusions you may think of…
Posted in InfoPath 2007, MOSS 2007 | Tagged: browser, browser forms, browser-enabled, GetUserProfileByName, infopath, moss, permissions, roles, security, sharepoint, user roles | 21 Comments »
